


Help with wicks for watering and draining
Guten tag,
I've checked many past posts on wicking for watering and draining purposes,but I can't find any clear-cut instructions anywhere, even google. Many contradictory "musts" have sprouted up as well. Water source must be below pot. Water source should be above pot. Wicks need to be an absorbent material. Nylon is a good choice (since when is nylon absorbent??). One hole. Two. Gravity. Bottom. Side.
I guess I need some basics of how water moves through a wick COUPLED WITH real world suggestions. I've seen several of Al's articles as well as his replies to my requests for help, and they've been very useful. For tomatoes in 5-gallon buckets as well as 18-gallon totes, I need to know wick sizes and materials. Many have said that nylon clothesline works. Or is this only for drainage when gravity is the helper? Can a wick drain UPWARD (for plants placed in-ground in clay soil, would an absorbent wick with one end placed in planting hole help remove excess water upward to evaporate after a rain?)? If I get one size wick for watering for the 5-gal bucket, how many of the same size would I need for the 18-gal tote? Do they really need to encircle the soil at the halfway mark, or will pushing them down a few inches from the top of the soil line be sufficient? Also, for some tomatoes in containers that have been there and growing (slowly) for weeks now, would it behoove me to thread a wick into one of the drainage holes (they're not very big, my largest drill bit is about 1/4 inch)? Will pushing some topsoil up to the holes have the same effect as allowing the container set on soil to allow the soil to act as a wick in bringing down the perched water table (my drain holes are on sides about 1/2" from bottom, not on the bottom itself)?
A lotta questions, I know, sorry. I really need to get these seedlings in and I'm afraid I'll find out after the fact that I shoulda done this first, or done that last, or, or, or.....
I think Lowe's sells cord by the foot, not sure how diverse the materials are. Should I buy a few yards of something they have, or is clothesline the way to go?
Thanks to all,
Joyce
Comments (18)

tapla (mid-Michigan, USDA z5b-6a)
14 years agolast modified: 9 years agoYou need an absorbent wick to pull water upward into a container to achieve 'wick watering'.
It's helpful to use an absorbent material to drain water from the PWT, but not necessary. I often use a toothpick during demos - soggy soil just stopped draining. All pushes a toothpick through the insect screen on the bottom & most, if not all, the water is drained from the PWT.
When draining water, if the wick is in contact with the soil, you also employ the wicking potential of the entire earth. ;o) The same is true if you have a continuouis link between the soil in the container and the natural soil. This is like the pot-in-trench method useed my many nurseries - like 'heeling-in'.
You can drain a container full of water if the wick is trong enougth to pull the water up to the containers edge & the wick hangs low enough over the lip/rim.
You can water from above with a wick, but it's no different than pouring water on the container - it just takes a little longer. There are certain ways you can make adjustments, but it usually involves LOTS of trial/error experimentation.
A wick won't 'drain' a container (with soil) by wicking upward (too far, i.e - it will be effective for the 1/2" you referred to). It would only serve as an evaporative wick.
Holes 1/2" up the sides of the container are a bad thing, unless the planting is able to use the water in that 1/2" @ the bottom within a few hours so aerobic conditiuons can quickly return to that soil.
10 wicks (or drain holes) are no more effective than 1, it just reduces the amount of time it takes a container to drain. Plants don't really care if it takes 2 minutes or an hour, though.
Al
Copy/paste this URL to your browser to see what I use:http://www.acehardwareoutlet.com/(hb4hxy45s2r55t55oihaebzc)/ProductDetails.aspx?SKU=10481

avajay
Original Author14 years agolast modified: 9 years agoThanks Al (again!),
A few things...
You said,"When draining water, if the wick is in contact with the soil, you also employ the wicking potential of the entire earth. The same is true if you have a continuouis link between the soil in the container and the natural soil."
Does this also apply to my clay soil? And how dry does the soil have to be. For example, after a rain storm...will native soil be draining at a faster rate, pulling the water from the container?
You said,
"You can drain a container full of water if the wick is trong enougth to pull the water up to the containers edge & the wick hangs low enough over the lip/rim."....
...then said...
"A wick won't 'drain' a container (with soil) by wicking upward (too far, i.e - it will be effective for the 1/2" you referred to). It would only serve as an evaporative wick."
The two statements sound contradictory, but I believe I'm just not understanding the 2nd one correctly. What do you mean with "too far, i.e. only effective for the half inch referred to"? Could you re-word that (sorry for sounding like a dummy). Also, when you say "...if the wick hangs low enough over the lip/rim."...how low is low enough? What principles are in play there?
You said,
"10 wicks (or drain holes) are no more effective than 1, it just reduces the amount of time it takes a container to drain. Plants don't really care if it takes 2 minutes or an hour, though."
Wouldn't it make a difference in a heavy rainstorm, though...water moving out the bottom at a faster rate before conditions at the top become lake-like? Or, if heavy rains are passing through the soil for several hours at a time, maybe it wouldn't matter if there's a lake at the top, the same conditions would be present at the roots.
"You can water from above with a wick, but it's no different than pouring water on the container - it just takes a little longer."
That's why I'm trying to employ it. I had surmised from my readings that wick watering keeps soil at an even moisture level without having to monitor constantly (assuming no rainstorm).
How do you use your mop strands? Braid? Lengthen in any way? Do you use them for watering or draining, or both?
I really do appreciate your timely answers to my questions, Al. I don't know how you take care of everyone on the forum like you do. You must not sleep.
Thanks,
JoyceRelated Professionals
Americus Landscape Contractors · El Mirage Landscape Contractors · Melrose Park Landscape Contractors · Pine Hills Landscape Contractors · West Haverstraw Landscape Contractors · Ferguson Landscape Contractors · Albany Solar Energy Systems · Columbia Window Contractors · Houston Window Contractors · Edwardsville Window Contractors · Meadow Woods Window Contractors · Pedley Window Contractors · Suitland Window Contractors · Winnetka Window Contractors · San Mateo Fence Contractorstapla (mid-Michigan, USDA z5b-6a)
14 years agolast modified: 9 years ago"When draining water, if the wick is in contact with the soil, you also employ the wicking potential of the entire earth. The same is true if you have a continuous link between the soil in the container and the natural soil."
Does this also apply to my clay soil?" Well, sort of. ;o) And how dry does the soil have to be. For example, after a rain storm...will native soil be draining at a faster rate, pulling the water from the container? If there was only a small pocket of clay surrounding the container, the added gravitational flow potential (GFP) of the water above the level of the normal PWT would speed up the percolation rate of the surrounding soil, but in an in situ situation, that's something akin to dipping a bucket of water out of Lake MI. The level of the lake DOES go down, but .....
The benefit comes in not when it's raining, but after. WHILE it's raining, gravity will force any water above the normal PWT level to move laterally put of the container and over the surface of the soil, The clay still has tremendous 'pull' when it's dry, because of it's small particle size (that's why they use it in kitty litter & oil/floor-dry products), so as the surface dries, if there is a bridge between in situ soils and the soil in your containers, the dry surface soil will have tremendous capillary pull on any perched water in the container. This won't work though, if your containers are sited in a depression (read puddle).
"You can drain a container full of water if the wick is strong enough to pull the water up to the containers edge & the wick hangs low enough over the lip/rim."....
...then said...
"A wick won't 'drain' a container (with soil) by wicking upward (too far, i.e - it will be effective for the 1/2" you referred to). It would only serve as an evaporative wick."
"The two statements sound contradictory, but I believe I'm just not understanding the 2nd one correctly. What do you mean with "too far, i.e. only effective for the half inch referred to"? Could you re-word that (sorry for sounding like a dummy). Also, when you say "...if the wick hangs low enough over the lip/rim."...how low is low enough? What principles are in play there?"
In the case of draining a glass of water, you have only the cohesion of the water to overcome (+ a small amount of insignificant adhesion to the sides of the glass). Trying to drain soil from above would dictate that you also have to overcome the adhesion of the water you're trying to extract to every soil particle it touches, PLUS its attraction to itself. You're not going to do that. You'd have to pull water from the PWT all the way through the water with NO perched water and then have it drain over the lip of the container ..... nope.
"Wouldn't it make a difference in a heavy rainstorm, though...water moving out the bottom at a faster rate before conditions at the top become lake-like? Or, if heavy rains are passing through the soil for several hours at a time, maybe it wouldn't matter if there's a lake at the top, the same conditions would be present at the roots."
Remember, the only water you'll actually be draining with the wick is that in the PWT. The GFP will take care of the rest.
"I had surmised from my readings that wick watering keeps soil at an even moisture level without having to monitor constantly (assuming no rainstorm).
When wick watering from below, you will reach stasis, in which no more water will be wicked upward until some of what is already in the soil is used by the plant or evaporates. In the case of wick-watering from above, the soil will still reach stasis of a sort, when the soil is at it's normal water retention (normal PWT height), but it will not stop the water flow from above. It will continue to flow into the container and out the bottom .... and you will still have the PWT to contend with. That's why I said you can achieve something reasonable with this type of wick system, but only after a lot of trial & error tinkering that will all be negated when cultural conditions change.
"How do you use your mop strands? Braid? Lengthen in any way? Do you use them for watering or draining, or both?"
I coil them in the container bottom & situate 1 strand through a drain hole so it hangs through the grow bench. (My benches are like bleachers & made of the commercial plastic planks that greenhouses use. They're 8" long & similar to the milk crates with the cross-hatch design - lots of holes for drainage & air movement.)
I COULD use them for watering, but the deteriorate too quickly for that. I usually position any container I'm wick-watering over a reservoir & use a braided plastic tie from an onion or citrus bag as the wick. It's funny that they work, because the polypro or polyeth they're made of does not absorb water, yet because they are woven, they seem to have just the right capillarity to raise water that 3-4" I need to get it to the soil in my shallow containers. I only employ this for a very few plants.
Whew! ;o)
Al
vrkelley
14 years agolast modified: 9 years agoHere were my indoor findings for wicks with 2 parts Miracle Grow potting soil and 1 part Perlite
SETUP 1
Horizontal wicks (around the circumference of box)
One 1/8" wick nylon thread
Two 32oz watering bottles stationed higher than box
32" Long x 18" Wide X 6" deep rectangle boxFindings SETUP 1:
When the wick sat on top of the soil, the wick provided a good water supply to the first 12-16" of soil. This large box needed Four 1/4" wide wicks.SETUP 2
Four 1/8" nylon wicks running down the inside of container
Wicks had a knot at the bottom and a 3" strand that drew water up from a catch tray.
One 3 gallon container sitting in a catch tray of waterFindings SETUP 2:
Wicking worked well while tomatoes were small, but as the plant demanded water, the plant couldn't get enough water to the middle and upper part of the container. So I had to water from the top AND bottomSETUP 3
Same setup as Setup #2 with 1/4" wicks instead.Findings SETUP 3:
Slightly better but as plants got around 2' tall, I had to water from the top.CONCLUSION
When the plant is under one foot tall, wicks seem to work the best for drawing water up from the bottom of the container.1/4" wicks worked the best but if you only have 1/8" wide string, double it up.
aliceinvirginia
14 years agolast modified: 9 years agoCouple different thoughts.
I tried to do a home evaporative cooler air conditioner several years ago. A cotton cheesecloth/floursack towel draped over the side of a container would steadily drip water over the side. That was on a table. I stuck a fan underneath the table that would blow air through the towel and evaporate the water. That sorta worked but wasn't powerful enough. I found that when the water was closer to the top, the flow was faster.
So that is how a "wick down" system would work. Just steadily feeding the water down, without too much concern about what the needs of the plant were. This works if the absorbancy of the wick will bring moisture up to the top of the container. Then gravity pulls it down.
My guess with watering from above is that the flow isn't related to the needs of the plant. It is just based on number and size of wicks along with size of containers.
I'm extrapolating from readings and experience with the earthbox/5 gallon bucket self-watering containers. If you use a wick from below, the wick has to be fairly wet until the bottom level of the earth. And it won't wick if the soil is completely parched through.
I bought some "plant-sitter" wicks from a large, well-stocked, overpriced nursery nearby. They said to bury one end of the wick in the soil, and place the water level of the feeder container at the same height as the plant. Adjust the container up or down if you want less/more water. Haven't tried them.
I tried the 2 liter soda bottle self-watering containers. Cut the top half off, overturn into the bottom half. Using pantyhose as wicks didn't seem to work well. I was trying to use Al's mix but the bark I had was coarse and uncomposted. The wicks extended to the top, only 4". This was either way over or way underwatered.
I've also tried dishpans with pantyhose wicks and those didn't seem to work well either.
Alice
dangsr_grow
14 years agolast modified: 9 years agoI am useing soil for a wick with great success, it is simple and cheap, what else could you want.
vrkelley
14 years agolast modified: 9 years agoSo in short, the wick idea seems like a hype. For short-term time frames like when your plants need water on a long weekend, the wick is probably OK.
Maybe if you've had great success with wicking water for medium and large plants, you could post alot of details i.e., container height, number of wicks, and wick width.
avajay
Original Author14 years agolast modified: 9 years agoThanks all,
Well, I went to Lowes and bought some nylon cord, about 3 different sizes(1/4, 5/16 & 3/8 I think). I ran the largest one (I think I bought about a 4' length, wish now it was longer) through a hole at the bottom, up to about midway and circled it around a bit, then covered with remaining soil. Forgot to mention, the container is an 18 gallon tote. The end outside the hole I ran into a half-gallon milk jug of water set alongside of the tote. On the other end of the tote is a short length of one of the ropes inserted into an identical hole, at the bottom, just enough to make contact with the container soil to help a bit with drainage. The free end it tucked under the end of the cardboard upon which my tote is sitting, and it is in contact with native soil, which should help with any perched water table I may have issue with in case of heavy rains.
I have the surface of the container soil mulched with plastic cut from an empty potting mix bag, tucked into the sides, which I imagine is probably like putting sheets on a water bed.
I'm just experimenting at this point. If this setup will keep my tomatoes alive should I forget to water them, as I've done in the past, then I will have learned something, and I'll know what to do in the future.
I plan to cover the exposed portion of the feeder rope with some press-n-seal to eliminate evaporation, place a cap on the milk jug with a hole in it just large enough for the rope, keep the plastic mulch on the plant, and monitor the soil as well as the water level in the jug to gauge the effectiveness of the setup. I have no moisture meter, I'll just have to play that one by ear. Later I may have to add another jug and feeder wick. We'll see.Dangsr_grow, what do you mean about using soil for a wick? You mean as in self-watering containers?
Details, please.Alice, what was that about hose and a dishpan? How was that setup supposed to be done? Also, I'd be interested to hear more about that air-conditioning thing you tried.
Vrkelly, I'm confused about that 1st setup. You said the container was 6 inches deep, then say the wick only watered the 1st 12-16 inches. Was that a typo? Or do you mean the 1st 12-16 inches LATERALLY closest to the wick?
Thanks,
Joycevrkelley
14 years agolast modified: 9 years ago>>think I bought about a 4' length, wish now it was longer) through a hole at the bottom, up to about midway and circled it around a bit, then covered with remaining soil. Forgot to mention, the container is an 18 gallon tote.
If your wicking method work, how about posting a drawing of your 'threading pattern'. My wicks only seemed to work but when the plants complained, I found that water was wicking only to the the first 12-16" of the wick. When I stuck my fingers down the rest of the wick was nearly dry.
vrkelley
14 years agolast modified: 9 years ago>>Vrkelly, I'm confused about that 1st setup. You said the container was 6 inches deep, then say the wick only watered the 1st 12-16 inches. Was that a typo? Or do you mean the 1st 12-16 inches LATERALLY closest to the wick?
Yes, that particular set up went around the circumference of the planter.

DLEverette_NC_Zone7b
7 years agoThis thread has some very good information. I have some roses that I think are suffering from a high perched water table (I just lost my second one this season). I think using a wick is a good solution until I can get around to making a more suitable soil and repotting them. On that note, I have a couple of questions:
1. Does the container have to be raised? My containers sit on pavement with drainage holes at the bottom. Can I just run a wick from the bottom of the container to nearby soil?
2. Can I insert the wick while there's soil in the pot? If so, how far should the wick be inserted? Can I just do something simple like attach the wick to something like a chopstick and run it into one of the drainage holes?
All of the pots are 16 inch pots (15in wide x 13.7in tall) except for the large pots which are 24in wide x 20in tall
I'm pretty new to the idea of using a wick, so any advice is appreciated!Ananda Munasinghe
7 years agoBrainstorm
Does (1) a piece of PVC pipe or (2) a tube of net or (3) a sleeve of cloth full of soil plugged to a hole in the bottom of a pot serve the purpose of a wick to drain the PWT?
Does a net pot have a PWT? - Munasinghe, Sri Lanka
Ananda Munasinghe
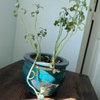
7 years agoI am
very satisfied with your answers. Thank you.I
asked one of the questions with the idea pictured below in mind. It
is of a self-watering pot devoid of perched water.I
learnt about PWT from your writings in the forum. Before that I tried to drain
all water with pebbles etc. at the bottom of the pot but roots would rot. Until
then I could not devise a way to get rid of the PWT for a self-watering pot.Would the
idea work?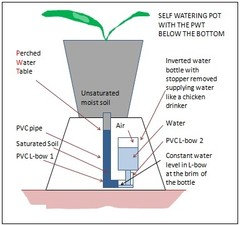

Steph H
7 years agoThis is great! I am looking for a simple solution. I am obsessed with succulent gardens in bowls and pots. I do have a few that have been planted in pretty bowls or cups with no drainage holes. Can I use the wick method to wick out extra water that happens when they get rained on? This happened last night and my poor bowls looked like little swimming pools. We don't currently have eaves on this house to put them under for the rain.
tapla (mid-Michigan, USDA z5b-6a)
7 years agoDrill drain holes in your pots and use a soil that allows you to leave your plants out in the rain for extended periods. With any succulent soil you use, you shouldn't need a wick, though one can be employed to reduce the negative effects of soils too water-retentive.
Al
tapla (mid-Michigan, USDA z5b-6a)
4 years ago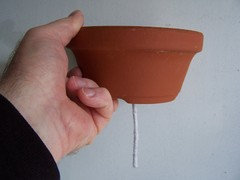
This one is longer than necessary 3-4" is good ........ and it only works when it's in the vertical position below the pot.
I answered your message and gave you some reading suggestions. These images should help you:
Compare B to A to see how much additional perched water will leave the pot simply by tipping it.
D is one way of using ballast to reduce the volume of soil in a pot that is capable of holding perched water.
Al


tapla (mid-Michigan, USDA z5b-6a)