


Renovating a Brick Pathway
I'm not sure if this is the right forum to post this but I couldn't find another where it would fit.
I own a 95 year old house, that I moved into last year or so ago.
The front pathway is brick, the brick itself is in good condition however, over the years the walkway has evidently not been cared for (along with the rest of the house) and because of it, has shifted substantially. The bricks are not level and the material which they are sitting in (whatever it was to begin with) is either non-existent in some areas or loose and very porous in others. It seems to be on a gravel bed, not sure.
Because of this weed control is a particularly challenging problem. We're constantly pulling clumps of them out from between the bricks. Thankfully, they come out easily but still, back breaking.
We had the front steps that come up from the street repaired as these were in danger of falling apart completely; relaid and repointed, etc. We couldn't use the original bricks as they were so deteriorated at that area and finding ones which matched the existing was difficult. It also, cost a small fortune.
I do not have the money to re-do the path at this time, or ever most likely. I've already doubled in repair costs what I paid for the house initially and there are still other more pressing items to finish before a path replacement would be high on the list; as it's rather long and wide and I know it will be pricey.
So, is there an economical way to make the brick more stable in the ground? Are we able to fill between the bricks with something to stabilize them, or are we doomed to taking the path up completely and resetting it all? It isn't quite a tripping hazard - yet, but it certainly isn't flat enough to make me feel totally comfortable either.
I appreciate any help offered.
Comments (22)
 PRO
PROYardvaark
12 years agosivyaleah, could you please post a photo on the thread that shows the situation? (Upload the photo to a photo-hosting site ...tinypic.com is easy; obtain the html code there and paste it into your message. It will appear when you "preview" the message, or you used the wrong code.)

karinl
12 years agoYou could simply put mortar between the bricks but forecasting the future may depend on the surrounding situation - tree roots, drainage, etc. And if you someday want to relay it with the bricks, they will be tougher to re-use with mortar on them.
I suppose you could also just pour concrete over top, but I'm sure that won't hold up well and you or a future owner will regret it :-)
In your position - a thousand things to do and no time to do this properly - I might be inclined to pull up the brick, make a decent base of sand, and buy the cheapest 2ftx2ft concrete slabs you can find to make an interim walkway. It will be easy to adjust if you get any heave or sinking, and will save you the weeding.
Karin L
Related Professionals
Reading Landscape Architects & Landscape Designers · Graham Landscape Architects & Landscape Designers · Taylorsville Landscape Architects & Landscape Designers · Choctaw Landscape Contractors · Fort Myers Landscape Contractors · Long Branch Landscape Contractors · Woodburn Landscape Contractors · Dorchester Center Decks, Patios & Outdoor Enclosures · Aventura Decks, Patios & Outdoor Enclosures · Canton Decks, Patios & Outdoor Enclosures · Dayton Decks, Patios & Outdoor Enclosures · Green Bay Decks, Patios & Outdoor Enclosures · Medford Decks, Patios & Outdoor Enclosures · Rolling Meadows Stone, Pavers & Concrete · Burleson Swimming Pool Builders
mad_gallica (z5 Eastern NY)
12 years agoThis is what RoundUp is for.
If the path is dry laid, I'd just pull it up and reset it. It can be done in pieces, and is quite easy once you get the hang of it. However, the 'new' path won't be an improvement from the weed perspective.

Laurie
Original Author12 years agoThanks for all the comments everyone.
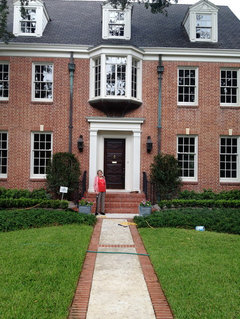
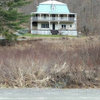
Here is a photo of the walk way:
{{gwi:7544}}
{{gwi:7545}}
As you can see, the bricks are all kind of jagged to each other.
The only tree nearby is on my neighbors property, although it is rather close. I had my landscaper create beds late this summer which we never filled in yet since it was too hot to deal with. Kind of glad I didn't do it yet as it turns out.
I do not want to lay concrete over it, or even replace with concrete. The brick is original to the home I'm pretty sure.
adriennemb2
12 years agoThat's not as bad as I imagined. I'd just pull up all the bricks but the step and the cemented-in curbs, dig out the current underlayer, create a deeper more compact base and re-lay the bricks in the same pattern but with an edging. There's lots of step-by-step information for you to refer to out there on the internet and library. Actually, your local stone or rent-all store should be able to help you too.
karinl
12 years agoBut those gaps are huge. You could relay them as flat as a pancake and still have a weed problem. They can be laid much tighter... of course, you'd need more bricks.
Karin L
louisianagal
12 years agoLooks to be alot of character in that house! Regarding the walkway, believe me I am no expert on these matters, but it does look like an awful lot of work to re-do it, and the weed problem is constant. Might you consider removing the bricks, except for the steps, and using concrete to make a walkway. You could perhaps incorporate the salvaged bricks as borders or dividers along the concrete walkway. Not sure what the cost would be but if you plan to live there long-term might be a solution.
Laurie
Original Author12 years agoThanks Louis, the house does have enormous character. It's very unique, a one of a kind type of home. A combination of Craftsman and Victorian with some elements of Praire as well. It's also built of terracotta block, which is unusual in New Jersey.
I can't put concrete down at all even if I wanted to. My town has already told me I'm at my maximum lot coverage and concrete is considered "coverage". I know, ridiculous.
I can, put down pavers, because they are considered non-permanent. However, very pricey. I had a small patio done in my back area this summer with some new landscaping. The patio alone was around $3000 or so (it included some walkway area). I would imagine the front walkway would easily come out to about the same amount because of it's size.
My pocketbook can't handle that right now as I still have some big ticket items that are more pressing to finish off a Temporary Certificate of Occupancy on the house, one of which is painting the home (over $5000) and a bathroom which is literally falling apart daily. I paid $225K for the home and have already spent nearly another $200K in renovation costs and I'm just about at the end of what I can spend for a good while; but I keep looking around and seeing more that needs repairing. *sighs*
Yep. Old homes. Gotta have deep pockets and a good stomach for them :D
- PRO
Yardvaark
12 years agoBrick paths, especially older ones, and especially if laid by the homeowner, are notorious for being improperly installed. What you have is not that uncommon. The only true fix is to reset the brick and fix the base and setting bed in the process. The wide gap and inferior edging both contribute to the walk surface going cattywampus (sp?)after installation.
Setting a brick walk like this is actually a pretty simple process, but it does take some work. Also, finishing it properly requires a vibratory plate compactor (looks like a push mower) which you can rent. And some sand. If you pull up the brick and discover that it's on a thin sand layer only, then you'd need to excavate about 4 inches deeper and put in that much driveway gravel and compact it. If you don't do these things, you will end up with a walk that will fail again... much sooner than you wish.
If you re-do the walk, as pointed out previously, its dimensions will shrink a little because of the wide gaps between the brick. I would use it as an opportunity to add brick and widen the walk to the width of the cheekwalls. The joints between the brick should be very narrow...barely at all. You see that the walk pinches in from the steps. This is not because of an attempt to make an aesthetic improvement. It's because of budget cuts and cheaping out in 1917.
If I lived here, instead of excavating as much as I mentioned earlier, I'd raise the level of the walk at the porch one step higher, therefore eliminating one of the steps. You'd have 4 steps up to the porch instead of five. You'd also pitch the walk ever so slightly more in doing this (better drainage.) And once you added a little soil to blend it's grade into the yard, nothing about it would be noticeable by anyone.
There are some good reasons not to do a project like this in stages: you don't want to rent equipment twice; it will work its way apart until all bricks are locked in by installing the edging (hidden edging is best); It would be difficult to obtain a truly uniform surface; it would be in a rather messy appearing state until complete;
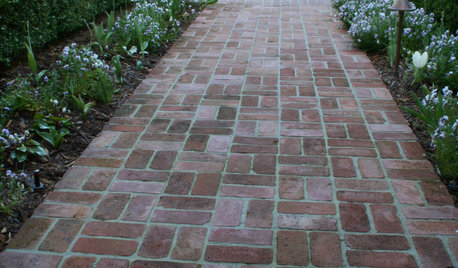
Here's a picture of a much the same thing being done for the first time by a homeowner. (In this case they raised the walk up one step at the porch, too. Nobody wants to walk up more steps than they must.) It did not need to be THIS big of a mess, but they removed an old concrete walk and the pile of rubble is still there. And homeowners are not as tidy as pros!
{{gwi:7546}}
missingtheobvious
12 years agosivyaleah, you mentioned that you could not find bricks to match the existing ones.
You want to use the existing bricks, for historical reasons as well as to save money. You want to minimize the spaces between bricks, in order to keep the walkway stable and also to reduce weed growth.
You also want to keep the size of the original walkway; this means you'll have to add additional paving of some sort -- and it can't be concrete. In your situation, this is what I'd consider; a major factor would be the size of the existing bricks.
First, count how many usable bricks you have and measure them carefully. Next, calculate how many square feet those bricks will cover if laid as close together as possible.
Next, calculate how large the walkway needs to be. Subtract the square footage of the bricks from the square footage of the walkway. How many square feet do you need to add?
Visit your local garden centers, construction supply places (mine sells pavers, fancy landscaping stone, cinder blocks, mulch, and other useful materials), and big box stores to see what they have in the way of concrete stepping stones. What I see here are 12" and 16" squares; the larger size are about 2" thick; they come in a brickish red color as well as natural concrete color.
Can you find any stepping stones that your bricks will fit around evenly? If so, develop a pattern -- something along the line of a concrete stepping stone every so often, with an attractive pattern of bricks around it. [If I were doing this, I'd draw the borders of the walkway on graph paper, then cut out contrasting-color squares the dimensions of the concrete stepping stones, and try placing them at various intervals.]
If the stepping stones you find aren't a usable size, you can look into having someone cut flagstones to the best size (ideally stone that would match the colors of the stone on your house). I know it's possible to rent saws to cut concrete and bricks. [Since you don't need very many square feet of stone, you might get lucky and find enough for your project on Craigslist.]
If cut stone is a no-go for whatever reason, consider making your own stepping stones out of concrete. Since these will be movable stepping stones, your town shouldn't consider them permanent coverage.
Disclaimer: I am most definitely not a pro, and I don't know how much difficulty you'd have if the bricks and stepping stones turn out to be significantly different thicknesses.
karinl
12 years agoI think you are considering it expensive because you seem to be paying for labour for everything. Materials for the walkway can be very cheap, especially if you hunt for used materials.
Do you do any work yourself? Because if you do, this is a simple enough job. I think Yardvaark has overstated it. All you really need to do (or have done) is
a) pull up all the brick,
b) try to scoop out the dirt that has settled between the bricks - you want sand in there, not dirt,
c) add more sand and level it. Make it flat and step on it till firm, but you don't need a compactor,
d) lay your bricks in place again, with more bricks added after MTO's planning process.But you know what else you could do for a quick and effective solution for now? You could lay rubber over top of the bricks you have. Home Depot carries rubber tile in pretty big sizes. I have actually found some bigger rubber mats that I like, but you won't have a Canadian Tire near you :-) I use them in the back yard and am delighted with them.
Put a layer of sand over your brick to even it out. Then lay down rubber mats, the biggest sizes you can get to minimize the number of seams. Bingo, you're done.
Karin L
Here is a link that might be useful: Rubber mats at Canadian Tire
drtygrl
12 years agoIf you know any local landscapers you can ask them if they have old bricks you can buy. While they will not be exactly historically correct, you could probably match the patina of the bricks you have. Then relay the bricks. If you are going to pull the bricks up - you might as well make the base correct so you don't have to face this problem again- its not that hard. Can you do this kind of work yourself? If not - in this economy you could probably hire a laborer or a couple of hardworking teenagers who you supervise to do the project according to your instructions (based on the instructions on the internet.)
The difference between doing the walkway over correctly and doing it over on the cheap thereby re creating the problems you already have, is probably about 4 man hours of work. In my mind its worth doing it right in exchange for the longevity that a properly done walkway will have.
If your choice is between doing it on the cheap or not doing it based on price; my choice would be buy a good supply of round up (good idea Mad -g) and leave it for a few years until you have the money to do it correctly.
Laurie
Original Author12 years agoLots of amazing good information everyone has given me here.
What it boils down to? I think I need to get some quotes for the labor. BF and I are not equipped to do this on our own physically at all. Both of us a bit past our prime to say the least without going into specifics.
I have people that have been working on the house for a while and the guy that did the landscaping; I'll start there. My brother is in the *sort of* home improvement business in name only but may know some eager kids that could use making some cash on the side.
As for the rubber mats; if my house wasn't so old and possibly even historic (we haven't gotten around to researching it yet) it sounds like an interesting idea but laying down such a "new" material around all the old brick, stucco, and wood is out of character entirely and goes against what I'm trying to accomplish in restoring the home. I haven't been able to be accurate with many things but I have tried my best to keep all materials as close to original, as possible.
If it turns out to be too costly I'm going with drtygrl and dumping Round Up on it come Spring lol. I mean, my chimney exterior is in dire need of repointing in the next year or so and that, and in the grand scheme of things I have to prioritize the work. The walkway, just may have to wait another year or two unless the price for someone else to do is turns out to be more reasonable than I expect.
Or I sell the house. Which I doubt lol.
karinl
12 years agoIn principle and in the long run I think exactly the way that Drtygrl does, and that you do. And if weeds were the only issue, I'd even buy into the round-up approach, which I usually don't :-). I was trying to think of something that would mitigate the nearly-a-tripping hazard fast and inexpensively for however long it takes you to get around to redoing the walkway properly.
For what it's worth, my husband and I had to re-level a patio for my parents a while ago. We did basically what I recommended above, though we didn't have to add stones, and it's held up well. The difference between bringing in a compactor and not bringing in a compactor was not getting it done at all vs. getting it done. There was simply no way the heavy equipment was going to happen due to constraints of space and people (we can't heave those machines around any more, and the patio is a bit elevated), so we had to find a way without it. It works. It might work for longer in BC than in New Jersey, but still, it works.
Like you, I live in an old house and understand the to-do list that goes on forever! Good on you for taking the house on, and I hope it pays off in the long run.
Karin L
inkognito
12 years agoThis is what I would do if the budget is too tight to do a proper job and if labour is available cheap or free: take up all the bricks including the edging. Do the math as above and instal a thin timber edging to accommodate the bricks you have (no gaps)then rake whatever is under the bricks level: set the bricks in a simple stretcher bond shoulder to shoulder with a rubber mallet and brush sand into whatever gaps appears. I wouldn't mortar any joints especially not in white neither would I put back the wonky edging but use those bricks in the path proper. A simpler pattern and smaller (or no) joints will be a lot tidier than what you have now, the cost will be in labour mostly.
- PRO
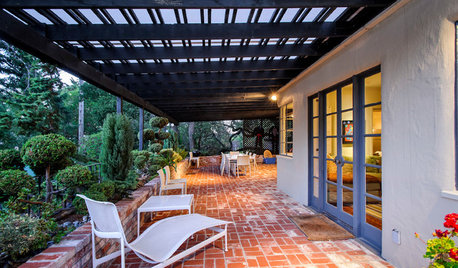
Yardvaark
12 years agoIn spite of being accused of overstating the reconstruction of the walk, I'll say that, as I've done several of these with my own hands (sample below,) I consider the mechanical compactor ESSENTIAL... IF you want the walk to be smooth as melted cheese from day one and IF you want it to last. You can do a pretty good job by hand-tamping on a small project like this, but it's sooooo much more work and takes longer. It will never be as smooth. It will never be as compact and therefore, will settle unevenly over time. Also, if you don't have a good crusher run (driveway gravel) base (that also must be tightly compacted) you will not have lasting stability where there is freezing of the ground. A layer of brick on an inch of sand is just too thin for that (especially when the bricks don't fit tightly together.)
I doubt very much if the walk is original to the house or even close to that era. It looks like a later homeowner add-on. The brick looks like salvaged, used brick since there are different sizes, half bricks and paint on them. You could probably find more in the same vein or use it as a field and border each side with new. Because of the different sizes, you'll have some wider gaps here and there, but no real worry. When tightening the joints, because of the different sizes, you might find a basketweave pattern more difficult to achieve than a running bond (lengthwise.) I would not mix different thickness pavers. This would be very difficult to assemble with any reasonable speed.
Per weeding, it would be impossible to get roots out by hand. I'd Round-up or consider a longer term herbicide solution. (Btw, don't buy name brand Round-up. Glysophate is much cheaper in the off-brands. Especially in a "farm" type store. Read the label.)
{{gwi:7547}}
marthebell
10 years agoYou have probably already redone your brick walkway, but as I was reading this, it occurred to me that you might ask for a variance for your local municipality due to your age and for safety reasons improving the sidewalk so that as you age it will not be a danger and cause one of you to fall due to the uneven surface. Request to replace part of the brick with concrete re-using bricks from the walk (a sustainability principle) to edge the new sidewalk set so that you have an 8" (size of a brick) edge on both sides of the walk as well as insetting a row of bricks at intervals between the new concrete slabs, These bricks would be perpendicular to the edging bricks. It will be historically accurate, lovely with your home, and above all, far safer! Add handrails at the steps! I don't think your local architectural board or government entity will agree the necessity of a safe entry to your home.
Laurie
Original Author8 years agoI can't believe people are still posting to this years later LOL.
We still haven't done anything with it. Other things have been way more pressing, like a boiler replacement! I'm grateful for anyone still commenting. Hoping we can get to this by next year but it's gotten lower on our priority list especially, since there's a chance we may wind up moving in the next couple of years. We've added plantings (boxwood, tickweed, roses, lavender, catmint, daylilies) which has helped it's appearance greatly. It hasn't gotten any worse at least and nobody has tripped either :D I thought I had a recent photo but apparently not. Will try to remember to take one.
cakbu z9 CA
8 years agoHeck, if path does not pose a tripping hazard, I would buy a gallon of Roundup for the weeds and call it "good". I don't think it looks that bad...I like rustic and it goes with the house. Later, when you have the $ and inclination, you can replace it whichever way you like.
Laurie thanked cakbu z9 CAsooz939
8 years agoBTW, Laurie, only the cat thought the project was exhausting. We mixed the old brick with some new to maintain some of the ""old & charming" look. :-) - Susan


sooz939