This thread is a draft of the title subject. Presently unfinished, I expect to illustrate it in the near future with examples. For a quick synopsis, follow the bold print.
Taking Usable Landscape Photos ...
Rather than being merely about placing outdoor objects where they will be enjoyed, landscaping is as much about creating an environment -- various forms of "floors," "walls" and "ceilings" -- from those same objects. Analogously speaking, landscape is not just the art in the museum. It is the art and the museum gallery itself. Therefore, it is important when submitting photos to, as accurately and completely as possible, CONVEY SITE CONDITIONS and SURROUNDINGS. To a large extent, photographs will illustrate needs and constraints. Photos that are of the wrong subject matter, without context, incomplete, with bad lighting, out of focus or are stretched all out of whack by the digipanoramization process, are useless in terms of showing someone who has never been to the site, what its assets, limitations and volume are. If these are not known, it is not likely that one can get good help. The pictures are our visit to the site!
Photos should be properly “framed,” showing everything useful. Landscaping is also about linking and connecting spaces to other spaces. While you may be interested in landscaping the front of your house, it is likely that in the process you must address what is next door, on the edges of your neighbor's property, and in your own yard all the way to the curb or street. You wouldn't expect a room interior to be successfully designed based on a photo of a section of baseboard! When designing a landscape one must see the overall, wide view in order to know how to coordinate and properly treat smaller, limited areas within it.
The primary objective of photos is orienting others to your property and its surroundings. While there will be some differences in the details of how pictures are taken from one area to another, the general principals will be the same for capturing any space ...
1. Begin with a wide view showing how things fit together, including area around and outside of the space in question.
Take photographs from the vantage point of primary importance. For example, if it is the front yard, the photos will likely be taken from the street. If it is the back yard, they will be likely taken from the deck or patio.
Line up the camera with the center of the scene … not from an angular view. ("Line up" does not mean measured -- as if one was preparing to construct an important building -- but "eye-ball" in line.)
Include the building in the scene so that viewers know how the landscape space relates to it.
If multiple pictures are required in order to capture a single scene, they must overlap and be taken from the same viewpoint so that the viewer is able to follow the scene.
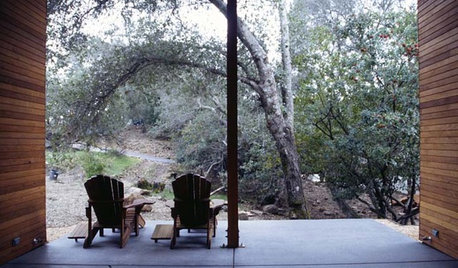
2. After the introductory, wide-view photo(s) has been taken, it may (probably will) be necessary to take one or more supporting photos that show details. Sometimes it will be necessary to see a view from the side or at an angle if that's how it can be made more clear. Sometimes, additional photos may be taken from the reverse point of view of the starting photo. For example, at the front yard, one may wish to show the view from the front porch looking toward the street. At the back yard one may wish to show a view taken from a distant point looking back toward the house, patio or deck.
3. All pictures should be in-focus and well lit. You might know what the fuzzy things are or what's in the black shadows because you see them every day, but others will not.
4. Move vehicles if they are blocking key portions of the view. (Those covering non-critical features like garage doors may remain.)
5. Do not substitute a digitally generated panoramic photo for the introductory, wide view photo as it will distort and shrink portions of the scene to the extreme, making it useless. Viewers unfamiliar with the property need to see regular focal length pictures in order to grasp a site's dimensions and spatial relationships.
Either of two methods are able to capture the wide view of the subject space ...
1. The first and easiest method is to step back until the wide view fits completely within the camera viewfinder and can be captured in a single shot. The disadvantage of this method is that distant details may not be seen. Making the scene understandable will probably require supporting photos taken closer to the subject matter. If this method forces one to stand at an awkward location, such as a busy street, use the following method ...
2. The second method for capturing a wide scene is to stand at one location and pan the camera across the scene, capturing sections of the overall view in slightly overlapping photos. The advantage of this method is that it doesn't require moving as far away from the scene, so therefore automatically shows greater detail. In order to use this method, begin by aiming at the left end of the scene and work rightward, with each photo slightly overlapping the previous one, without gaps. (For the sake of convention and making them easier to understand, post photos so they appear in the left-to-right order.) It is critical that all pictures of a single scene be taken while the camera remains at the same location. The photographer will simply pivot to take each picture. This allows the viewer to see the scene nearly as if they were standing at the site. They can follow the sequence and orient themselves from one shot to the next. And it is, practically speaking, the only way that reassembly of the photos into a single composite, panoramic photo, is possible. Moving to different locations while capturing a single, wide scene will negate these possibilities.
There are times when obstructions (trees, large shrubs, etc.) prevent the forthright capturing of a view. In such an instance, one may need to capture the scene from various angles and in sections. If this is the case, the scene must be captured from between the obstructions, wherever the vantage points exist, from multiple points of view. It is only by seeing the scene from several points of view that one can comprehend the overall space. Still, each scene needs to be wide and show surroundings.
When many obstructions exist, one might also consider resolving or ameliorating the the condition PRIOR to taking pictures. Chances are good that some plant material will be unwanted and can be removed. If the foliage of trees is the obstruction, chances are also good that lower limbs should and can be removed. If one is in doubt about whether foliage is unwanted, or where to start with the removal process, it is likely that by submitting a few WIDE shot photos, advice can be obtained. In some cases it's possible that the clearing process would need to occur in installments based on photos submitted periodically.
Photographing the front yard:
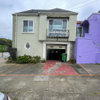
1. Most homeowners are concerned about the image of their home as seen from the street, so more than likely, the pertinent, wide view of the house and yard will be photographed from the street direction, with the camera in line with the center of the scene.
2. The complete house and front yard should show in the picture. Also, a portion (whatever is pertinent) of the flanking properties should show.
{{gwi:44213}}
Photographing the back yard:
1. If concerned how the scene is viewed from the deck or patio, that should be the camera location. Creating a wide view looking outward (toward back lot line) will usually require a camera panning operation. (Again, all shots must be taken from the same location while merely pivoting the camera.) While standing at a central area on the deck or patio, face the left side of the back yard and take the first picture. (The leftmost, back wall of the house will show up at the left side of the viewfinder.) Pan rightward taking shots at slightly overlapping intervals. (At the last shot, the rightmost back wall of the house will show up at the right side of the picture.)
2. If the concern is in regard to landscaping adjacent to the house, deck or patio, move the camera to a location at a distance from the subject, but in line with the central axis of the scene. Use the photographic method that is best able to capture a wide view of the scene, including extra space at each (left and right) end of the scene. (If the scene is of the entire back of house, one would probably want to include space all the way to left and right side lot lines.)
Photographing a side yard:
1. Stand at either the front or back yard (depending on the view you are trying to capture ) in line with the central axis of the side yard space. Use the single-shot or panning method (whatever works best) to capture the complete side yard from house to lot line. Views of the side yard may be need to be taken from both front and back yards.
2. If one is concerned with foundation planting within the side yard, then it may be best to stand near the lot line (or even in the neighbor's yard if they permit it) in line with the central axis of the scene, and take panning shots from left to right in order to capture the complete scene.
Photographing a linear space, such as a long driveway or lane:
1. In order to orient a viewer to a long driveway or similar feature, one can photograph the space in sequential shots, not panning from left to right, but taken while looking forward along the path of travel, at periodic intervals as one passes through the space. In other words, as one walked down a lane, he would take a forward-looking picture every 40 feet or so (the exact interval depending on what shows up in the viewfinder.) The viewer must be able to relate one photo to the next so what shows up in the mid or background, must show up in the foreground of the next photo in the sequence.
The photos in a sequence can be taken from the vantage point of exiting or entering the property, depending on what is needed.
Here is a link that might be useful: Thread for discussion of FAQs for Landscape Design Forum
This post was edited by Yardvaark on Fri, Aug 29, 14 at 1:08


peren_awkward
YardvaarkOriginal Author
Related Professionals
Ashland Landscape Architects & Landscape Designers · Signal Hill Landscape Architects & Landscape Designers · Bound Brook Landscape Contractors · Mesa Landscape Contractors · Middle River Landscape Contractors · Miller Place Landscape Contractors · Overland Park Landscape Contractors · South Lyon Landscape Contractors · South Portland Landscape Contractors · Dayton Decks, Patios & Outdoor Enclosures · Lenexa Decks, Patios & Outdoor Enclosures · Lewisville Decks, Patios & Outdoor Enclosures · Owings Mills Decks, Patios & Outdoor Enclosures · Manassas Swimming Pool Builders · San Juan Capistrano Swimming Pool Builders