


Good Growing Practices - An Overview
Good Growing Practices
My hope is that this thread becomes a gathering place for beginners and the experienced alike, a place where reliable information that is rooted in sound science and horticulture can be found. We will see how that 'gathering' part goes, but I have enjoyed enthusiastic participation on many of my other threads on this and other fora, so I am optimistic.
As I consider what I am going to share with you and how to go about sharing it, I am compelled to offer some background that will hopefully allow some degree of comfort in placing some measure of value on my commentary. I enjoy the growing experience tremendously. I have worked hard toward increasing my skill level for more than 20 years, and I look at sharing what I have learned about the growing sciences as a natural extension of the enjoyment I get from nurturing plants - sort of nurturing people who nurture plants. I am invited to lecture frequently in the mid-MI area, and occasionally beyond. I lecture, conduct workshops, and do demonstrations on a variety of subjects related to growing, but most frequently I talk about things related to container culture, with maintaining houseplants being one of the most requested topics. I also enjoy participating here at Garden Web and at another popular garden forum sites. Hopefully we will be using some links to some of my other offerings here that will help you share some of the confidence others have shown in the reliability of my offerings. Those that know me know I am not after recognition or glory, I simply feel I can help any beginner with a willingness to learn and apply the newfound information, and I get a large measure of personal satisfaction from the feeling I may have helped someone along the path to becoming a better grower.
The first challenge is to offer information that a beginner can digest, and in such a way that he or she feels it is important enough to act on. I am first going to flesh out the main issues that, if understood, will make anyone a better grower and hope I have created enough interest that there will be plenty of questions so I can go into greater detail in the answers. For what it is worth, I tend to look at growing anything in containers from the perspective of what is best for the plant, not what is best for the grower. Far more often than not, the two ideas are mutually exclusive, so if grower convenience is a large priority of anyone reading this, there is not much sense in reading on. Growing well does take a little thought and a little effort.
The houseplants we grow are perennials nearly all, capable of growing for many, many years and of being passed from generation to generation. With attention to the areas I will cover in this post, you will discover that you can maintain your plants in good health for as long as you continue to commit to providing favorable cultural conditions. Your plants are all genetically programmed by Mother Nature to grow well and look beautiful. It is only a lack of knowledge and skill in the area of providing the cultural conditions they prefer that prevents them from growing to their potential. That sounds harsh, but it is the truth.
I have never seen anyone other than me discuss growing plants in containers from this perspective, that is (and it bears repeating) your plants are already genetically programmed to grow well and look beautiful, but it is up to you as a grower to eliminate the limitations so often associated with growing in containers. This post is about isolating some of the factors that are commonly the most limiting and helping you to reduce the limiting effects. For more information on the concept of limiting effects, do a search using the words "Liebig's Law of the Minimum" or follow this embedded link to How Plant Growth is Limited additional discussion.
Soil choice - Growers should realize that the most important choice they will make when establishing a new planting or when repotting is their choice of soil. A poor soil is probably behind more than 90% of the issues that growers come to the forums seeking remedial help for. Collapsed or dead plants, spoiled foliage, insect infestations, disease issues are all symptoms usually traceable directly or indirectly to a poor soil. This is so important to understand, that I will devote the bulk of my effort toward making it clear why I offer this contention.
Light is extremely important to plants. Plants make their own food, using water, CO2, and energy from the sun. Inadequate light means the plant cannot make enough food to grow to the potential for which it was genetically programmed. I will not go into great detail about light because when it comes to houseplants; you either have good light or are forced to deal with the limiting effects of inadequate light. If the thread finds favor, we can discuss supplementing light and how to prune to help compensate for the leggy appearance caused by insufficient light, or explore other topics of interest relating to light.
Nutrition supplementation is a requirement for normal growth and good health when growing plants in containers. In the earth, many of the nutrients are supplied by minerals in the soil. Container soils usually have no mineral component (and it is best that they do not in most cases - more later), and the soil components break down so slowly and are washed from the soil so quickly that deficiencies are virtually assured if you do not fertilize. Choice of fertilizer is also an important consideration, as we will see.
Repotting vs. potting up - that there is a difference between the two operations is a concept foreign to most hobby growers. One of the practices ensures your plants will at least have the opportunity to grow to their genetic potential within the limits of other cultural conditions; that would be repotting, with its accompanying root maintenance, complete or partial bare-rooting, and a change of soil. Potting up, on the other hand, only temporarily allows the plant to grow a little closer to its genetic potential before root congestion and a diminished number of fine roots quickly returns the plant to the state of limited growth and vitality it was experiencing before potting up.
Watering habits - extremely important and inextricably linked to soil choice, which is why I saved it until the end of this, the short list - so it would lead me back to the most important consideration - the one most apt to determine the difference between frustration and a rewarding growing experience.
Air is as important as water in all soils plants are to be grown in. Plants absolutely love plenty of air in the root zone, and rebel very quickly at too much water in the soil. I am going to describe what happens when you water plants growing in a soil that retains too much water. There are actually two possibilities. The first is, you water, and a part of the soil near the bottom of the container does not drain. This water has a name, it is called 'perched water', so named because it 'perches' (like a bird) in the soil above the pot bottom. This excess water is critically important because it very quickly begins to kill roots growing near the bottom of the pot - within hours. The first roots to die are the roots that do the lion's share of the work - the very fine roots often referred to as 'hair roots'. The longer the soil remains saturated, the larger the diameter of the roots killed. When air finally returns to this once saturated soil, roots can only then begin to regenerate. This takes energy and is extremely expensive for the plant in terms of energy outlay. During the cyclic death and regeneration of roots associated with excessively water-retentive soils, the plant is actually forced by chemical messengers that tell it to 'grow roots', to direct energy that would have otherwise gone into growing more leaves, branches, blooms, fruit, or just increasing the overall mass of the plant, to replacing the lost roots.
The second thing that might happen when you water if you are using a water retentive soil is, you adopt the practice of watering in 'small sips' so the soil remains damp instead of wet; this, to guard against root rot. It makes sense to only give the plant a little water at a time so the soil never gets soggy - right? That might be a workable option if you have the luxury of using water that has been processed through a reverse osmosis water filtering system, or if you are watering with distilled water, but regular tap water has things dissolved in it, like magnesium, calcium, iron, sulfur, and others. If you water in 'sips', these dissolved solids remain in the soil and build up over time. This has an impact on the plant's ability to absorb water and the nutrients dissolved in water. To illustrate the potential impact these dissolved solids have on a plant, picture in your mind what curing salt does to ham or bacon. It literally pulls water from the cells & dries out the meat. Any solutes (anything dissolved) in the solution surrounding plant roots can have the same potential effect on plant cells. It can make it difficult for plants to absorb water and nutrients, it can make it impossible, and in some cases can actually reverse the flow of water so it moves OUT of cells, effectively collapsing and killing them. We commonly call this 'fertilizer burn', but it does not necessarily have to result from an over-application of fertilizer. When people come here wanting a remedy for foliage that is dying, with dried edges & tips, almost always it is the result of over-watering exacerbated by water-retentive soils and the accompanying limitation that has on root function and metabolism, or as a result of the presence of a high level of dissolved solids from fertilizers and tap water having accumulated in the soil making it difficult for the plant to take up water. Both are so closely related to poor, water-retentive soils we can say the problem is inherent if not addressed directly.
Misting cannot correct a problem related to over-watering or a high level of solutes in your plant's soil. Low humidity can be a contributing factor to the common symptoms of necrotic (dead) leaf tips and margins (edges), but for the actual cause, look to impaired root function from over-watering or a high level of dissolved solids in the soil. BOTH of these conditions are nearly always linked to a poor soil. Misting raises humidity for a few minutes, but there are almost 1,500 minutes in a day. Raising humidity for 10 of the 1,500 has virtually no impact on the plant's ability to keep foliage hydrated. If you have foliage with burned leaf tips and margins, you should look to the soil and the state of root health for the cause.
When using water-retentive soils, it seems almost as though we are on the horns of a dilemma. If we water generously, we risk the soil remaining saturated so long it causes root rot, or at a minimum - impaired root function. If we water sparingly, in small sips, we risk an accumulation of dissolved solids from tap water and fertilizer solutions in the soil - so what to do? Well - I think we should look at an option that solves both issues and makes things much easier for the grower, while also providing the grower with considerably more latitude when it comes to watering and fertilizing.
The factor that determines how water retentive and difficult a soil is to grow in, is the size of the particles it is made from. The smaller the particles - the greater the water retention and the greater the degree of difficulty for growers. Soils made of any combination of peat, coir, compost, sand, topsoil, and other fine particulates are going to be very water retentive, which we know is undesirable from the perspective of the plant, and they cannot be suitably amended to correct drainage or the height of the perched water by adding perlite or other drainage material. If anyone disagrees with that statement, please ask for an explanation before mounting an argument or offering individual observations. Adding perlite to soils reduces the overall water retention of the soil, the reduction usually being a plus, but it does nothing measurable for drainage (flow-through rates) or the height of the perched water table, the later being the critical consideration when it comes to a healthy root zone.
Soils made of a high % of pine bark or other inorganic particles will have plenty of large air spaces called macropores. These are pores that will not hold water, only air, even when the soil is as saturated is it can be. They are critical to a healthy root zone. If you build a soil with plenty of air space, it hardly matters what the soil is made from. What is important is how the soil is structured. I will grow a perfectly healthy plant in a bucket of broken glass on a dare and a wager if anyone is interested in taking me up on it. If you have a soil with a healthy structure, a good nutritional supplementation program, and have good available light, the rest is so easy anyone can do it - honest. I have seen it happen over & over and over again. You will not go wrong if your primary focus is providing a healthy - a truly healthy environment for roots. Roots are the heart of the plant. Roots come first. If you cannot keep the roots happy, there is no chance you can keep the rest of the plant happy. That was a paraphrased quote from Dr. Carl Whitcomb, PhD, who wrote the bible on "Plant Production in Containers".
This ends the beginning discussion about soils. Until you are able to grow plants, the growth rate and appearance of which you are happy with, focusing on removing the limitations placed on your plants by soil choice will almost always constitute the best use of your energies. After reading this far, if nothing else, I hope you take that concept from this offering. It is the most important point and the best piece of advice I can give you. If you are interested in knowing HOW to make soils that will help you remove the limitations, now is the time to ask.
Nutrition is an area that is very misunderstood when it comes to container culture, but it is actually very easy. It is also very easy to become confused because there are so many numbers that represent different fertilizer NPK percentages and so many different kinds of fertilizers. I will need to use some numbers, but I think an understanding of NPK percentages as opposed to fertilizer RATIOS is important. NPK %s tell us how much (N)itrogen, (P)hosphorous pentoxide, and (K) potassium oxide (the symbol for potassium is 'K') are in a fertilizer by weight. So a fertilizer that is labeled "All Purpose 24-8-16" is 24% nitrogen, 8% phosphorous, and 16% potassium. 12-4-8 is also a common "all-purpose" fertilizer. It has exactly half the nutrients of 24-8-16, but both are 3:1:2 RATIO fertilizers. Ratios are a way of describing the amount of nutrients in a fertilizer as they relate to each other. Why is this important? It is important because we know that on average, plants use about 6 times as much N as P, and they use about 3/5 as much K as N, and now I will tell you how we can use this information to our plant's advantage.
The ideal way to fertilize is to supply fertilizer at the same ratio in which plants use the nutrients. The reason is because optimal growth and vitality can be had only when nutrients are in the soil at overall levels low enough that it does not become difficult for plants to take up water and nutrients dissolved in that water. Remember what we said above about a high level of soluble in the soil making it difficult for roots to absorb water and nutrients? Nutrients also need to be present at levels high enough to prevent deficiencies. If we think about it for a second, we can see that the best way to achieve this end is to supply nutrients at the same ratio in which they are used.
I noted that the NPK percentages actually tell us how much phosphorous pentoxide and potassium oxide are in a fertilizer so I can show you how fertilizer manufacturers arrived at a 3:1:2 ratio as their "all-purpose" blend. Only 43% of the P reported on a fertilizer label is actually P, and only 83% of the K reported is actually K. Once you apply these factors to any of the 3:1:2 ratio fertilizers (24-8-16, 12-4-8, and 9-3-6 are all popular 3:1:2 ratios), you will see they supply nutrients in almost exactly the same ratios as the average that plants actually use, and these fertilizers are excellent at keeping the overall level of solubles as low as they can be without creating nutritional deficiencies.
There is no need to use 'specialty' fertilizers; and many specialty fertilizers, like the advertised "bloom boosters" with up to 30 times more phosphorous than a plant could ever use (in relation to the amount of N used), can be (almost always are) moderately to severely limiting because the excess nutrients are a limiting factor.
The question often arises, "Should I use a synthetic or an organic fertilizer"? The answer is: "Use whichever you wish"; but the qualifiers are: Organic fertilizers are actually more accurately called soil amendments. They are mixed into the soil in the hope that at some point soil organisms will digest them and make them available in elemental form so plants can absorb them. The problem with that approach is that the populations and activity levels of soil life populations in containers are erratic and unreliable, making the delivery of nutrients from organic sources just as erratic and unreliable. What you apply today, may not be available until next month, and there is no way to determine what residual amounts of which elements remain in the soil. Soluble fertilizers like Miracle-Gro and others are completely available as soon as applied, and we know exactly what our plants are getting. They are simply much easier to use and deliver nutrients much more reliably than other fertilizer types. You can lump controlled release fertilizers like Osmocote and others in with the soluble synthetic fertilizers. With them, you get an extra measure of convenience but sacrifice a measure of control. As with all fertilizers, it is important to note the NPK percentages to be sure you are supplying the fertilizer in a favorable ratio if you want your plants to be all they can be.
When it comes right down to what occurs at the molecular/cellular levels, plants take up nutrients in elemental form. They cannot absorb the nutrients that are locked in the hydrocarbon chains that make up organic fertilizers until the molecules are broken down into their most basic elemental form. At that point, all nutrients are taken up as salts, and all are in the same form, no matter if they came from compost, a dead fish, or a hose end sprayer. Plants could care less where their nutrients come from, as long as they have a constant supply of all essential nutrients at all times.
It is not going to kill your plants if you use a fertilizer with a less than favorable ratio because plants tend to take the nutrients they need from the soil (solution) and leave the rest, but it is important to understand that it is 'the rest' that constitutes a limiting factor; so avoiding unnecessarily high levels of any one nutrient or nutrients whenever possible is to your (plant's) benefit.
It is important to understand that growing in containers is markedly different than growing in gardens. On a scale of 1-10, with 1 being growing in the garden and 10 being hydroponics, gardening in containers is much closer to hydroponics than gardens, getting a rating of somewhere around 7 or 8. This is why many of the practices that serve us so well in our gardens do not work well in containers. One area that is often a sticking point is the idea we need to "feed the soil". While that is an admirable and productive approach to gardening in the earth, container soils are more about their structure than about any nutrients they might supply. If you concentrate on your soils structure and durability, and more specifically its ability to hold plenty of air, you will greatly increase both the probability of consistent success and the margin for grower error. Well-aerated soils are easier to grow in and offer much greater opportunity for plants that will grow as near to their potential as possible.
As noted above, most growers draw no distinction between 'repotting' and 'potting up'. I have spent literally thousands of hours digging around in the root-balls of containerized plants. Old plants from nurseries of greenhouses are probably the closest examples to what most houseplants are like below the soil line, so I'll offer my thoughts for you to consider or discard as you find fitting.
I have also helped salvage many plants that had been containerized for long periods and were 'circling the drain'. Illustration: Not long ago, our bonsai club invited a visiting artist to conduct a workshop with mugo pines. The nursery (a huge operation) where we have our meetings happened to have purchased several thousand of the mugos somewhere around 10 - 12 years prior and they had been potted up into continually larger containers ever since. Why relate these uninteresting snippets? In the cases of material that has been progressively potted-up only, large perennial roots occupied nearly the entire volume of the container, plant vitality was in severe decline, and soil in the original root-ball had become so hard that in some cases a chisel was required to remove it.
In plants that are potted up, rootage becomes entangled. As root diameters increase, portions of the roots constrict other roots and impair the flow of water and nutrients thro
Comments (271)

Ekor Tupai
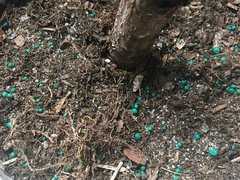
6 years agoRock/stone will eventually degrade and blend with soil, so it's normal and not harmful for plants since most of them become inert and brittle, even not soluble in water. Bigger size, take longer time to degrade. It's common for landscaper using crushed granite for garden design. But if you think contrast colour is irritating then using other materials will solve the problem.

Sergey Varlamov
6 years agoI am not after granite appearance but suitability for a good potting soil :). Although I am not sure yet how this salt-stuff is affecting my plants but suspect it, at least, stops baby cacti from rooting: none of them developed any roots after 2 months, while a year ago, when I used 'normal' soil, without granite they, baby cacti, grew exceptionally well.
cheers
Related Professionals
Lyons Landscape Architects & Landscape Designers · Seven Hills Landscape Contractors · Thonotosassa Landscape Contractors · Signal Hill Landscape Architects & Landscape Designers · Lakeville Landscape Contractors · Salem Landscape Contractors · Whitman Solar Energy Systems · Cicero Window Contractors · Phoenix Fence Contractors · Charlotte Fence Contractors · Collierville Fence Contractors · Fullerton Fence Contractors · Belvedere Park Landscape Contractors · Eagle Landscape Contractors · West Orange Landscape ContractorsEkor Tupai
6 years agolast modified: 6 years agoLol.. not granite appearance, i mean the 'salt' appearance. Yeah, maybe you better repot. The granite size just too risky to be used as potting soil. Maybe their breaking down rate quicker than compost... haha.

ewwmayo
6 years agoHonestly I don't find grit, even the non salty kinds, to be very good for rooting small plants or seedlings.
Sergey Varlamov
6 years agoI didn't mean growing in grit itself but using it as a part of gritty mix. For small plants and cuttings I sift the mix to have it in 2-3 mm range. It works fine - as long as it doesn't form salts; for example when I use coarse sand instead of DG.
Grit, sand, granite, scoria, pumice, etc - it can be anything if it is inert and of the right size.
cheers
ewwmayo
6 years agoYes, exactly. Most grit here is #2 or grower size which is too large to be optimal for rooting plants.
Sergey Varlamov
6 years agoHi,
I wonder if anyone can comment on status of my baby euphorbia obesa in the attached photo, their diameter ~15 mm. I grew them from seeds, they were developing quite well and were bright green. Then, about 4-5 months ago they stopped growing, shrunk and turned purplish-brown. I repotted them into smallish size (2-3 mm) gritty mix which didn't help. They both have just one, ~2 cm long tap root, no smaller ones at all. I keep them in filtered morning sun for 2-3 hrs, then they go to bright shade. Water them once every 2 weeks and soil gets dry usually in about a day. I have impression they still keep shrinking slowly.
Although spring officially just started, it has been warm, 17-25 C, and sunny for a few weeks, but these my two babies aren't showing any sign of life while most of my other cacti are busily making flower buds.
Are these two already dead or just dormant? Any chance to bring them back to life an how?
cheers

Sergey Varlamov
6 years agoHi again,
A related question. The attached is a photo of oak seedling purchased from bonsai nursery 7-8 months ago. It was before I came across this forum and I re-potted it into commercial bonsai soil conditioned with coarse sand. My soil drains well and dries usually within a couple of days in fine weather. After repotting the seedling quickly grew one new healthy leaf on the top, while older leaves developed those dry 'skeleton' patches, and then all stopped. Of course, it has just been through winter but it was mild Sydney winter, 10-20C, and the last month it was all warm and sunny, not much different from what others would call spring. I am concerned that the seedling shows no sign of new grows at all in this warm sunny weather. What can be wrong? I water it once a week (usually 3~4 days after the soil apparently gets dry) and fertilize every 3rd week.
I would re-pot it again into proper gritty mix and check roots at the same time, but I remember Al's advice to repot when a plant is in active growth which is far from the case.
Am I too impatient? I just don't want to be too slow and let the oak die from easily fixable course. Anything could and should be done now?
cheers

tapla (mid-Michigan, USDA z5b-6a)
Original Author6 years agoMost HOUSEPLANTS should be repotted in the month before their most active growth period, which would be just before the summer solstice. DECIDUOUS plants, like your oak, would best be repotted in spring before buds move - conifers 2-3 weeks AFTER deciduous; but, since I don't live in Oz, I'd defer to any experienced/proficient bonsai practitioners in your neighborhood insofar as when you should repot a specific plant species.
You need to keep reading until you're comfortable ticking off the potential reasons your plant has stalled. Is it a natural slow time in the growth cycle, soil compaction or excess water retention, root congestion, lack of fertilizer, temps too high or low, ......?
Al
Sergey Varlamov
6 years agoThanks Al.
When repotting, should it be done soon after watering, when old soil is still wet, or when it is dry, or something in-between?
How about those two cacti in my previous post: do they look dead or dormant?
cheers

Danielle Manson
6 years agoThanks Al!
I am new to growing house plants and this article was very helpful! I recently picked up some small Aloe Vera plants, a couple Dracaenas and a Peace Lily. I was hoping for some guidance on how to make the right soil for them and how to prune roots. Do you have a soil recipe? Should I make a special cactus soil for aloe vs. peat soil for peace lily? How will I know which roots to prune?
Any information on these topics would be very appreciated!
Thank you! :)tapla (mid-Michigan, USDA z5b-6a)
Original Author6 years agoDanielle - your reply is below Sergey's.
Sergey - repotting plants in peat-based soils is easier when the soil is a little on the dry side, but you need to consider that the roots you're going to keep shouldn't dry out. I've been the primary for a lot of demonstrations in front of gardening groups, during which I've repotted horribly root-bound plants while carrying on a discussion about care of potted plants over the long term. I generally remove (with a pruning saw), the bottom 1/3-1/2 of the root mass, then use a root rake and root hook (bottom row, third and 4th tools from the left)
to loosen the soil on the perimeter of the root mass. From that point forward, the roots need to be moist while you work on them.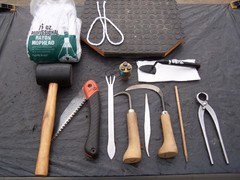
It's only slightly easier to remove soil from the roots when the soil is on the dry side if your plants are in the gritty mix, so I generally take a haphazard whack at the perimeter roots I know aren't going to stay with the plant, then make sure all remaining roots are moist from that point forward.
After bare-rooting and root pruning, when I repot into the gritty mix, I make sure the roots are wet and repot into DRY gritty mix. As soon as the soil is settled around the roots, I water slowly with a water brake until the water exiting the drain hole is perfectly clear. You can't do that with the 5:1:1 or peat-based soils due to their tendency toward hydrophobia when dry. You MUST break these soils' hydrophobic tendencies before you pot plants in them. The easiest way to do this is: before you start the repotting session, add about a 4th of the soil volume you think you'll need for the repot to a bucket, then add enough water to turn it to muck. Mix it well, then add enough dry soil to complete the repot and mix thoroughly with your hands (more fun). As you're doing the root work, the entire soil mass will become moistened enough (by diffusion) to break the soil's tendency to repel water; so when you've finished your repot, you won't have to worry about how you're going to moisten the soil. Again, that's for the 5:1:1 and peat-based soils - not the gritty mix, which is very easy to rewet, even if the bark fraction is completely dry. It might take 2 waterings 10-15 minutes apart, but roots won't be in danger due to the soil being water-repellent.
****************************************************************
Danielle asks: I recently picked up some small Aloe Vera plants, a couple Dracaenas and
a Peace Lily. I was hoping for some guidance on how to make the right
soil for them and how to prune roots. Do you have a soil recipe? Should I
make a special cactus soil for aloe vs. peat soil for peace lily? How
will I know which roots to prune? - You probably don't realize it yet, but in order for any reply I might offer to be meaningful, the qualifications I'd need to include would be a momentous undertaking. I think any advice I might give and you might follow would be no where near as valuable as the reasons the advice was given ....... that whole "teach a man to fish" thing.If you think what I said in the opening post makes sense, and you have a good understanding of what I said. I think you'll benefit from some additional reading about how important soil choice is to what kind of opportunity your plants might have to realize as much of their genetic potential as possible. We should all be able to agree on the fact that any plant you're likely to acquire will have the genetic potential to become a beautiful specimen. Your job, our job, is to make sure the cultural conditions the plant is given to deal with aren't at or beyond the limits it's genetically programmed to handle. That's a lot easier than it sounds, fortunately.
If you can put together a soil that allows you to water correctly, a solid nutritional supplementation program can be learned in 10 minutes; and, keeping the plant's root system happy is soo much easier than when using water retentive soils. That pretty much leaves making sure the plant gets enough (but not too much) light, and making sure it's not to hot/cold as the remaining concerns of note.
This will be a big help re your soil questions. There are even recipes toward the end of the post. You'll need to click on the note that says "show more posts" (or something similar) when the OP seems to just stop. The recipes are at the end, but in all honesty, an understanding of the concept is going to be of much greater value than the recipes ever could be. In fact, a true understanding of the concept actually makes the recipes superfluous.
Generally speaking, if you're limiting yourself to soils that allow you to water to beyond the point of saturation w/o the act being a limitation to root function/health due to prolonged periods of soil saturation, you WILL be using different soils for cacti and succulents than you would for most other plants. Plants like dracaena, sanseveria, and most succulents would prefer a soil like the gritty mix.
But, don't let yourself get overwhelmed at first by fretting about too many things. Concentrate on making sure your soil lets you water correctly. If you get to that point, you'll have the ingredients you can use to modify the soil you might use for a peace lily so it's more appropriate for other plants less tolerant of excess water retention in the soil.
There are dozens of helpful 'regulars' at the thread I linked you to who will give you whatever guidance you need. You'll find people there who are relatively new to growing in pots, but are already accomplished accomplished at it. Let me/us know what you think. Inquiring minds want to know. ;-)
Al
Danielle Manson
6 years agoHi Al,
Thank you for your quick reply! I just finished reading the post on Container Soils (of which you provided the link for) up until the point where it says "Continued Below". I realize that you had said I will need to click a link that says something along the lines of "show more posts" but I cannot see any link like that. The first portion was very helpful, but I am excited to read more to get some ideas of recipes so that I can formulate a soil that my plants will (hopefully) love! Any ideas of how to see the rest of the post?
Thanks,
Danielle :)
tapla (mid-Michigan, USDA z5b-6a) thanked Danielle Manson
litterbuggy (z7b, Utah)
6 years agolast modified: 6 years agoDanielle, I noticed the same thing. Maybe Al copied at least some of the IP from one of the previous 21 "Water Movement" posts and didn't remember to add the rest of the post...
Aha, I was right: the IP in the other Water Movement And Retention XXII thread includes the second half of the post, which is where you'll find the recipes and links to previous threads. It's a little confusing to have two threads with the same name running at the same time, but you can't stop people from staying enthusiastic about the material in both of them.
Enjoy!
Lenore
tapla (mid-Michigan, USDA z5b-6a) thanked litterbuggy (z7b, Utah)rina_Ontario,Canada 5a
6 years agolast modified: 6 years agoDanielle
In a post that Al linked to in his last post (This will be a big help re your soil questions.), there is a note after "Continued Below": See 4xx more comments - in green type. If you click on that, you'll get rest of first post by Al, and all immediate replies/comments/posts by the readers. That is done by the Forum not by individual posters, when there is lot of posts in a thread. Whenever you see anything typed in green, it is a link to some article/post/web site and so on.
tapla (mid-Michigan, USDA z5b-6a) thanked rina_Ontario,Canada 5alitterbuggy (z7b, Utah)
6 years agolast modified: 6 years agoRina, I don't see a link there, and although I can see all the replies in the thread without clicking on anything, Al's post is truncated. That's why I gave the alternate link rather than leave others like me frustrated because Al's link doesn't work as advertised.
tapla (mid-Michigan, USDA z5b-6a) thanked litterbuggy (z7b, Utah)litterbuggy (z7b, Utah)
6 years agoWell, I guess I lied, Rina. Below the box with the initial post and before the comments there's this:
"Comments (928)
See 428 more comments"
...followed by the most recent 500 comments. It took three or four minutes for my iPad Pro to load the first 428 comments when I clicked on the link, but sure enough, Al's continuation was the first reply.
My bad. I'm still glad to have found the other thread with Al's complete post in one box without having to wait for the second half to load, though...
tapla (mid-Michigan, USDA z5b-6a) thanked litterbuggy (z7b, Utah)tapla (mid-Michigan, USDA z5b-6a)
Original Author6 years ago..... been a really busy week for me, but it looks like you guys got it figured out. Tnx!
Al

Bee Birch
6 years agolast modified: 6 years agoYesterday I sat down after work and decided I would do some research on why, after implementing all of the tried and true methods I *thought* I knew worked for healthy house plants, my Fiddle Leaf Fig is still on the decline. I feel like I've been introduced to a new religion with one Google search leading me to GardenWeb.
I am wide open to any help that I can get on this one, and I feel I've already learned so much - I was up til 2:30am reading essentially every post I could find that the all-knowing Al has commented on. WOW. I thiiink that I have a handle on HOW to do the next steps (or which threads of the 20 I've bookmarked to go re-read) once I figure out WHAT next steps would be best to take. I think it will help if I try to share what I'm now aware might be most relevant to the plant's condition... based on the recent 8 hours of research.
My FLF came home in early September, and I moved her directly into a planter (with drainage holes) the exact same size as the black plastic pot from the shop. I was able to pick the tree up out of the pot with only slight effort and the entire root ball/soil almost completely intact in the same shape. I was happy because it made "repotting" (moving from one pot to another and maybe moving some soil around so it stands up straight, but nothing more) so much easier, and was thinking that this would be less traumatic on the plant.
During the first two weeks, there were no more than 5 dropped leaves as I played around with where her long-term home would be in my apartment, before settling in front of a big high-ceiling NW facing window. The owner of the plant shop I've purchased a majority of my houseplants from mentioned to me that FLF are "slightly higher maintenance" and instead of allowing the soil to fully dry before flushing as I'm used to with the several other plants I've gotten from him, that I'd need to water once only the top half of the soil is dry. He talked a lot about their natural environment and spraying the leaves to make it more humid if I wanted to. Oh, also - I'm in Denver, CO where weather during the Fall is drastically different day to day (80 and sunny one day and snowing the next, back to 65 and cloudy the next) except for the consistent dry air.

(Weird coloring is from me trying to lighten a dark picture)
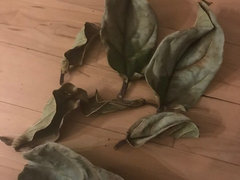
(This is what all of the leaves look like when they drop - color dulled, shriveled)
She was looking beautiful for about 5 weeks until we had an unexpected drop in temperature overnight, and I'd left open the window that the tree was directly in front of. It was in ~40 degree draft for around 12 hours, and I immediately brought the apartment up to about 75 and have kept that area between 70-80 since, as well as had my landlord seal the windows for the colder months. That was 20 days ago, and today nearly all of the leaves have shriveled and dropped except for the ones you can see pictured, at the very top.

(5 days after the window incident - droopy leaves, still dropping leaves from the bottom > up)
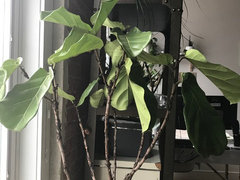
(Today - poor baby!!!)
I'd watered I believe 3 times in those 20 days, with yesterday being the 4th. I stuck a skinny wood/bamboo? kebab skewer deep into each plant's soil like I normally do before watering. This is the first time that the FLF stick came out totally dry and I was semi-panicked thinking this is a BAD thing, and maybe this is why the leaves were all falling off still? Was I under-watering and thaaat's why they're shriveling up? (I laughed out loud a handful of times while reading this site over how oblivious I was about caring for this plant!) When I water, I use a 1/2 gallon watering can with either filtered water from my fridge or from the tap that I let sit out for about a week, and I'd estimate that probably 10-15% of the overall volume of the pot comes through the drainage hole on the first pour, within 30-60 seconds. I usually do that two or three times until little to no water comes through the drainage hole.
I've reached out to the shop owner to ask if he's aware what media the tree is planted in and/or when the last time it was repotted, so I can always follow up with what I learn. I'm ready to run out of the house for some fertilizer or trek Colorado to find some bark to make organic potting mix of the perfectly precise ratio... but where should I really start?! Could the cold night have that big of an impact? Did I totally blow it with repotting/lack thereof? Do I have anything to lose with (correctly) repotting now?? How do I know if she is going to make it until the next growing cycle begins between summer solstice and July 4???? LOL :) I am very stubborn and madly committed to helping this baby recover if possible. Will be sincerely grateful for any feedback/advice that you wonderful people might be able to share!
tapla (mid-Michigan, USDA z5b-6a) thanked Bee Birchlitterbuggy (z7b, Utah)
6 years agolast modified: 6 years agoBefore worrying about repotting, get the plant thoroughly watered. If the water seems to be flowing through the pot without actually wetting all of the soil it may have become hydrophobic (unable to absorb water easily) from prolonged dryness. If that's the case just submerge the pot in a container deep enough so the water is higher than the top of the soil, and leave it there for at least a few hours. Keep refilling the container as the water soaks in. Use something heavy to weigh it down if it tries to float; I also finds that watering sloooooowly from the top helps get it to settle down.
The key to watering is to 1. water when the plant needs it and 2. water thoroughly when you do. Do let the soil dry out between watering, but water thoroughly when you do until at least 15% of the volume of the pot has drained out. For peaty soils I like to water again after half an hour to get any dry pockets that didn't get moistened the first time. Let it drain, and then tilt the pot at 45 degrees for, say, 15 minutes. If the drain holes are at the edges you'll see excess water draining out while it's tilted; if the hole is in the middle the excess water will accumulate while it's tilted and drain out when you set it upright.
I've been guilty of overwatering, but most of my plants' past suffering was caused by chronic underwatering (and mineral deposits, but mostly underwatering). Getting my watering under control was absolutely key to restoring my plants to good health.
Here's an excellent reference thread about water and soils.
tapla (mid-Michigan, USDA z5b-6a) thanked litterbuggy (z7b, Utah)Bee Birch
6 years ago@litterbuggy Thank you so much! I watered (what I thought was thoroughly) 2 days ago and when I just checked the soil, the wooden stick came out completely dry. I will try the method you mentioned and adjust my watering patterns moving forward to see if there's a turnaround!
tapla (mid-Michigan, USDA z5b-6a) thanked Bee Birchlitterbuggy (z7b, Utah)
6 years agoSounds great! Roots need both moisture and air to function properly, so watering container soil is all about maintaining those conditions as much of the time as possible.
When soil starts to feel dry to the touch there's enough moisture that's still available to the roots inside soil particles for them to stay healthy, which is why letting the soil 'dry out' between watering works, but that moisture will be gone a few days later, depending on things like soil type and RH, which is when roots die from underwatering with much the same symptoms as overwatering.
tapla (mid-Michigan, USDA z5b-6a) thanked litterbuggy (z7b, Utah)tapla (mid-Michigan, USDA z5b-6a)
Original Author6 years agolast modified: 6 years agoBB - It's always gratifying to be able to think your efforts might be
making a positive impact on someone else's growing experience; so thank you for taking the time to let us know you appreciate our efforts.I actually started to compose my reply early this AM, but have had to focus my attention on stuff not as fun.
At the base of each leaf is a zone (abscission zone). It serves as as part of a mechanism that allows leaves to be shed w/o allowing insects and diseases to enter the plant. Before leaves are shed, an abscission layer has to form. Via chemical messengers, the tree is able to detect the amount of water, and particularly hormones, that pass through the abscission zone. When the plant's chemical messengers tell the plant it's entering a period of drought, leaves are shed in order to minimize transpirational water loss and ensure the plant might be able to access enough moisture to sustain viability. Several cultural factors can cause or contribute to leaf loss. Sudden chill (as when the tree is subjected to cold drafts), soil too wet or dry, nutritional deficiencies, significant increase or decrease in photo load (light levels), root congestion, soil compaction. From what I've read, it would seem the leaf loss is primarily attributable to a drought response due to low soil moisture levels, but other factors could easily be contributory.
Is the filtered water from your tap water that has passed through an ionic exchange water softening system? If so, you need to reconsider using that water immediately because of its Na (sodium) and Cl (chloride) content.
Did I totally blow it with repotting/lack thereof? Not really. The increase in potential lost to root congestion accumulates fairly slowly. It's probably better to work through the winter with a tree limited by root congestion than one over-potted and trying to recover with an ill-timed repot. Do I have anything to lose with (correctly) repotting now?? Yes. It would be VERY hard on your tree, with recovery slow, which leaves the plant vulnerable to insect infestations and diseases for several months longer than it would be if it was repotted in summer. How do I know if she is going to make it until the next growing cycle begins between summer solstice and July 4? Nothing is carved in stone; but being "madly committed to seeing your baby recovers" increases the probability significantly. You can work around the root congestion for a few months, and making sure you're watering correctly is a big step in the right direction. That leaves nutrition, light, and temperature as cultural influences you should focus on getting to the point where you can see the plant is actually appreciative, instead of just tolerant.
In its simplest form, your job is to figure out what's preventing your plant from realizing its genetic potential, and to the greatest degree possible/reasonable, fix it.
Al
tapla (mid-Michigan, USDA z5b-6a)
Original Author6 years agoThank you soo much, Laurie. "Teacher at heart", perhaps, but for now I'm CEO/ majority owner of a small corporation/ glazing contracting business - a glass company. We sell/install/ store fronts, mirrors, shower enclosures, stained glass - anything you might expect a full service glass company to do. In addition to that, I am active in the local gardening community. It's not unusual for someone to call about, or show up at the business with a plant that needs help; and I regularly get requests from gardening-related groups to do a talk/demo/workshop of some sort. Most are related to soil, bonsai, houseplant care, or repotting.
I enjoy sharing here because of the fact I initially failed miserably at my first forays into the world of bonsai. The key element in why I try to help where I can is the fact it took me a long time to even FIND the information I regard as critical to my efforts (I started studying stuff about plants before the internet was a thing), information that has increased my proficiency in the art. When I consider the whole of what I know, I always reflect on the idea that, if presented in an abridged manner and in a way that makes the pieces easy to fit together, others can absorb the concepts in a tiny fraction of the time it took me to accumulate what I share. There's a lot of potential to be helpful in that idea.
I realize that being technical about growing isn't everyone's cup of tea. I'm not interested in people who won't be bothered with learning how to increase their proficiency, or those who keep asking the same question until someone offers a reply that validates extant practices limiting their plants' vitality. You can't push someone up a rope unless they want to climb, and there is no reward in trying. When I encounter someone who reacts like you or Bee Birch did, the potential for me to help you raise the plane on which you interact with plants increases dramatically, so I recognize that speaking to enthusiasm is almost certain to provide me with a much more rewarding experience that speaking to ennui.
I talk about soils most often because that's where almost all growers using off the shelf products can take the largest step forward they'll ever take in their container gardening attainments. Most issues, where vitality is a concern, can be traced straight back to soil choice and the resultant diminishment of root health. The number of soil discussions is directly related to the commonality of that relationship.
In the end, I'm here in large part for myself. I don't care about attention, but I do look for the personal satisfaction that comes with knowing I've helped someone get more from the growing experience. That's fun for me, and rewarding. It's come to be a natural extension of my o/a growing experience. I hope the rain stops so I can finish putting the front garden to bed for the winter. ;-)
Thanks again.
AlBee Birch
6 years agoThank you immensely, Al and litterbuggy, and to Laurie for perfectly describing a GW newbie's initial thoughts and appreciation :) I know this site will be an invaluable resource for me - and all of my plant-loving friends that I've been raving to - for years to come.
I have a pretty great update! Still have a few follow-up questions below, but I feel the results speak for themselves - ALL of the leaves perked up overnight, which I never expected to happen based on the resounding feedback that most Fiddle Leaf Fig leaves don't bounce back ever after they've drooped. I am slightly hesitant to get so excited over this turnaround, especially so quickly! Is this too good to be true? Here's a comparison with the picture I shared in my previous post, essentially a 36-hour turnaround:

@Al - the water I use is closer to a Brita type filter for lack of better terminology. It's just the "filtered" water that comes out of my refrigerator door. I did a quick Google search and I don't believe that this has ionic exchange water softening involved. Whether I use the water from my tap or from my fridge, it's usually been sitting out for anywhere from 2-10 days in my watering can (I fill it up immediately after I water my plants, and don't use it until the next watering). BUT, with this watering of the FLF, I wasn't able to do that because so much water was involved so about 1/2 of the water I used this time came straight from the tap.
With that said, I'm curious what feedback anyone might have on putting my FLF into the shower to water - should I do some sort of water pH test to know if this is a good option? I water my Madagascar Palm and Spineless Yucca in the shower because of their size/weight. Both of these plants are thriving, but with the FLF being very fragile, I don't want to mess with it. And for all I know, I might not be doing what's best for the other plants either! I read through the soil and watering post thoroughly and many of the comments, but not sure if I may have missed something related that would be helpful.
Also, @litterbuggy - would you say that the method you described is more like watering from the bottom up OR should the entire pot including the soil and base of the plant be completely submerged as well? I put the pot into a plastic bin that was only slightly larger than the FLF's pot and filled with water so that it was higher than the soil level (from outside of the pot), but the water was not coming up over the edge of the pot itself. I continued to refill the water level about every hour and within 6 hours, the visible soil was damp. I drained how you described, and about 15-20% of the pot's volume came out (the pot holds 1.25 gallons/20 cups and about 4 cups came out - am I doing that right?). I could already tell at that point that, even if I didn't follow correctly, the soil had absorbed much differently than it had been - I needed the help of a second person to get the heavy pot out of my sink.
Would you recommend that I continue that watering method, or if the plant truly was hydrophobic and now is showing a pretty drastic reaction does it mean that I might not need to submerge the pot moving forward? Also, I'd read in another sick FLF post to wait until I notice new growth before I begin using fertilizer (I have some Foliage Pro 9-3-6 on it's way to me!), so unless advised otherwise, I'll keep an eye out for some buds before I do anything. I will most definitely be waiting until summer to repot, too.
Thanks again, and in advance for any further guidance!
Sergey Varlamov
6 years agoHi everyone,
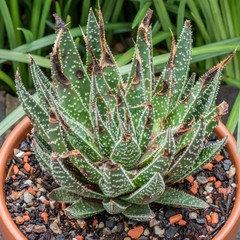
Would appreciate advice/opinion on a possible cause of poor
condition my aloe plant turned in recently. I grew it from a small cutting I
picked up from a stray street plant ~1.5 year ago. It used to be happy, all
green and spotless, and grew at least three times in size: now it is 12x9 cm (5x3.5
inch) in 15 cm pot. But then it stopped and developed dark and dry patches, particularly
on leave ends. I took it from the pot and found very congested, pot bound
roots. So, I pruned some of them and planted in a bigger pot with gritty mix.
It has been a couple of months since then and aloe is not getting better and
healthier but rather worse. I am confused if it is due to over or under
watering. My gritty mix is very well draining, too well apparently as a few of
my young plants dried and died in recent past due to under watering. I watered
them every 4-5 days but I didn’t realise then that the middle of the soil mix, where
roots were, was not getting wet as it turned hydrophobic.So, with my aloe, I make sure it gets enough water all through the soil but … I
am not sure if it is not too much of it though and that the plant is not rotting
rather than drying. The leaves feel quite thin and soggy. Any helpful ideas from the attached photos please?Thanks!


Laurie (8A)
6 years agoIf a Haworthia zebra gets soft leaves, it's too much water. I would get a look at the roots and see what is going on. It may be a good idea to just remove the plant from the soil and let it get nice and dry. If the roots are dark and soggy, cut them off. Good luck. I hope it snaps out of it for you.

hellkitchenguy Manuel
6 years agoSergey, if the middle of the soil mix had become hydrophobic, then your mix is not a gritty one. A gritty mix would allow water to flow freely through the entire roof mass. I would reconsider your mix
Sergey Varlamov
6 years agoThank you both.
Laurie - it is no haworthia zebra (which I have a few too) but some sort of aloe. I am reactant to take it out of the pot yet again, only 2 months after previous repot. But if it doesn't improve within another month I will have no choice. There is still spring here, there will be time to recover if I find and eliminate the reason for its sickness.
Manuel - I define my mix as gritty if it is made of constituents suggested by Al (in water movement and retention forum), or their alternatives as not everything is available here, turface for example. I use seramis, or DE, or pumice instead. But what I discovered not long ago was that after my mix dried completely pine bark turned hydrophobic and after watering once, the middle remained dry. Not sure why my mix behaves this way. Perhaps, those turface replacements are less hydrophilic and water absorbing.
I discussed this and how to deal with it in that other forum recently, and it was suggested, by Al in particular, that watering of dried mix should be done at least in two steps with 15-20 min break in-between to help wetting the mix all through. I also started using soil wetting agent. Bottom watering too ensures that the mix is fully wet. So, I am confident now that my aloe mix is not dry inside. But it is not helping it to recover from those dry dark spots. Water is there, air is there, why is it still sick?
tapla (mid-Michigan, USDA z5b-6a)
Original Author6 years agoBB says - ALL of the leaves perked up overnight, which I never expected to happen
based on the resounding feedback that most Fiddle Leaf Fig leaves don't
bounce back ever after they've drooped. There is a difference between the restoration of a leaf's turgidity and its return to spacial position it occupied before the wilting occurred. An abscission layer that forms at the point where a leaf is connected to a branch effectively isolates plant from leaf and prevents any flow of things like water, photosynthate, hormones, and other bio-compounds in either direction. Wilted leaves that haven't formed an abscission layer are fully capable of regaining a normal state of turgidity, but in some cases and several species in particular, they may not be capable of returning to their previous attitude/ spatial position.Whether I use the water from my tap or from my fridge, it's usually been
sitting out for anywhere from 2-10 days in my watering can. If you'd rather, you can skip this practice. Cold water won't 'shock' your plants, and chloramine/ fluoride aren't volatile, so they won't gas off. In fact, not that it's a serious consideration, when some of the water evaporates while in the can, it leaves ALL of the dissolved solids behind in the remaining water, which has the effect of slightly increasing the concentration of dissolved solids in the water you use. The more water evaporates, the higher the level of dissolved solids in the water that remains.I use a r/o filtration system, which effectively produces water with no dissolved solids, so mater how long I let it rest, the water remains at 0 ppm dissolved solids. I add fertilizer and store it in 1 gallon jugs, then water with a 2L watering can with a homemade nozzle that allows me to place the water precisely. This is very helpful because I have MANY plants crowded on 2 - 4x8 growing tables, and the lights above are so close to the plants it's difficult to water from above.

.... what feedback anyone might have on putting my FLF into the shower to
water - should I do some sort of water pH test to know if this is a good
option? As long as the water from the tap is appropriate for plants, I don't see too much in the way of negatives. I wouldn't let it rest in the shower until it's dry, though. It would likely take much longer for the foliage to dry in the average shower than in a room other than the bathroom. Fungal spores need a incubation period with continual moisture to get a toehold - no sense in offering it.I'd read in another sick FLF post to wait until I notice new growth before I begin using fertilizer ... That's generally a good strategy. Before you fertilize, though, I would flush the soil thoroughly by making sure the root/ soil mass is completely saturated, then slowly pouring a volume of room temp water equal to at least 10x the volume of the pot the plant is in to flush any accumulation of dissolved solids that has occurred to date. This is like hitting the fertilizer reset button and is much more critical than your average hobby grower realizes.
*****************************************************************
Sergey - I don't think the idea that the bark fraction of the soil becomes hydrophobic as the medium dries down is in play here. Here's why: Seramis and pumice don't become hydrophobic. In fact, they very quickly absorb water until they are saturated. Within minutes, the water they hold when saturated diffuses into the bark and breaks its hydrophobic tendencies. Even if the bark was extremely hydrophobic, that property would disappear soon after watering.
Water doesn't move well laterally in the gritty mix, as I mentioned to you on previous occasions. If you're watering every 4 days and following the advice I previously offered - to make sure you're watering the entire soil surface so the entire volume of soil particles has opportunity to absorb water, under-watering isn't the culprit. It doesn't even look like it's the problem. Soil particles being much too large is the only way I can see where under-watering might be the culprit, given your watering schedule of every 4th day. There is something else going on with your plant. If it's not over-watering or an inappropriate water source, it likely has something to do with a yet to be revealed source of phytotoxicity.
Keep in mind the necrotic spots on the foliage will always BE dead spots - until the leaf is no longer viable. Your plant cannot be restored to a blemish-free condition until all the blemished leaves currently on the plant are shed.
Al
Sergey Varlamov
6 years agoThanks for advice Al, very much appreciated as always.
In my post I was referring to my recent past problems. After discussion on Water Movement & Retention forum I developed watering routine which makes all soil wet, without any dry lumps inside.
Bear in mind that local materials can differ (and a lot!) between places and suppliers. There was a recent link on that other Water forum to a very informative youtube video on bonsai soil testing (https://www.youtube.com/watch?time_continue=14&v=Mt_a7g6C2Ls) where DE and pumice were in the top three, together with akadama, for water retention. However, DE and pumice I get here are definitely much less water retentive: I can't measure any water retention from volume difference before and after DE, pumice soaking . Also, once I bought pine bark labelled as "fine grade" - in fact, average size was 3-5 cm, and nothing smaller than 1 cm! Things vary!
So, I mean that wetting my gritty mix made up of local ingredients can be more difficult than you assume. I use commercial soil wetter now, 0.5~1 ml in 1 L, to ensure full wetting.
Yes, I do understand that the dead parts on aloe will remain until replaced with new growth. I don't mind as long as that new growth starts. Yet to see it. Should I repot again or leave it alone for now, to help coping by its own resources?
Cheers
rina_Ontario,Canada 5a
6 years agolast modified: 6 years agoSergey
I learned about gritty mix here, from reading threads by Al. That is all I use for all my succulents, and even for few non-succulent plants. I would probably use it for more of them - but bigger pots for bigger plants get quite heavy!
I am not absolutely sure what your plant is - I would think Aloe aristata (that usually has filaments at the tips of leaves) or a hybrid of. I just wanted to let you know that I have several aloes, all are potted in a mix of equal amounts of grit, coarse perlite and smaller amount of turface (maybe 15%-20% or so).
I have similar looking plant that was ID-ed as xGasteraloe 'Flow' (or xGastrolea...). There are few hybrids that are quite similar to this plant - xG. beguinii; xG. 'Royal Highness'... Here is the photo of it about 3wks ago:
I use chicken grit to make mix. Here is the photo of it - for potting mix, I use what is labeled as #2 (growers grit):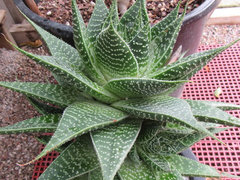 This plant gets watered, unless it rains, about 1x/week. If it is quite hot, bit more often. On the other hand, we had lots of rain this Summer (I keep all plants outside Spring to Fall); much more often than what is usual for us. No problem with too much water at all, as the mix I use drains fast.
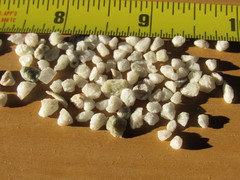
I am thinking that your plant maybe had rot you didn't see, just before your last repot about 2 mo ago. It looks like the leaves are yellowing toward center, at least that's what it looks like in the photo - that could be sign of them being water-logged. Damage looks fungal to me - if the stem or roots had some rot, it may have spread thruout the plant.
One of our members on Cacti & Succulents forum, ewwmayo, has taken time to measure porosity & water holding capacity of few different substrates. Maybe you would like to see his findings in this thread
tapla (mid-Michigan, USDA z5b-6a) thanked rina_Ontario,Canada 5aSergey Varlamov
6 years agoThanks for your thoughts, the name and the link Rina.
Yes, it looks like Aloe aristata.
A bit of confusion here: neither did I water this aloe every 3-4 days - it was about my other plants which nevertheless died from dryness. I am completely sure that my soil mix drains very well, water just runs through and whole mix gets dry within 2, max 3 days in warm weather (this depends a lot on pot size as well). I also noticed about this aloe before repotting that it felt better, with green and healthy new growth, when I watered it more than less often. Recently I watered it just like you, about once a week unless after sunny and hot day.
Any advice on what I should do to help it survive? Cheers
rina_Ontario,Canada 5a
6 years agolast modified: 6 years agoWhen repotting, did you check the roots? - did you get all old soil off the roots, especially if it was peaty? - did you check the stem by gentle squeezing to feel if it is hard or soft? If the roots & stem were healthy and it is in fast draining mix, I would likely leave it as is. Pumice is good to use. I have never used any wetting agent. If mix dries well, pot could be bigger than it should be for more water-retaining soil.
Obviously, in hotter climate you may have to water more often. I am not sure if you mentioned how you check if it is time to water?
Water should not be allowed to sit on leaves for too long, or collecting in the crown. Good air circulation and sunlight are helpful, and plant & soil/mix should not stay wet in cool weather. All of these will encourage aloe rust - fungus that causes the black spots. As Al suggested, these spots are permanent but usually do not spread. Using systemic fungicide will help some, best is the prevention: all the things I mentioned.
tapla (mid-Michigan, USDA z5b-6a) thanked rina_Ontario,Canada 5aSergey Varlamov
6 years agoAl and others,
I have a few week old pepper tree (ricoto manzano) seedlings. Recently, newly grown leaves have started curling inside, see photo. What can be causing this?
Seeds were propagated in 511 mix which I watered every 2nd day; fertilized weekly with weak general purpose stuff.
I did quick search for curled leaves, and most point out at possible overwatering and excessive heat. In my case, they get morning sun till ~10am, and then, if it is sunny, I open 70% shade over all my plants. Overwatering is possible as I don't let seedling soil dry even on the top but I thought, as Al wrote in water movement forum, in well draining soil one can't overwater plants
Thanks


HU-223545047
5 years agolast modified: 5 years agoHello all! I was diagnosed with systemic Lupus nearly a year ago, but have been very the last 4. I recently began tinkering with houseplants, after a daughter gave me a Peace Lily, which was over watered by my housesitter/dogsitter when we went on a vacation. The peace lily is pretty much the main stub I cut the black leaves from, and a few tiny green leaves coming up. I'm patient, so we'll see how it does.
I am confused by tags on plants that say thing like 'no direct sunlight; prefers shade,' but then you discover that the plant grows wildly and happy in a west facing window.
I would love to have trailing plants and very large plants. I trim my Pothos to keep them bushy on top, use a homemade roofing enzyme, and have a lot of small pothos around. Can you recommend a nice trailing plant that won't go near bare on top, and a good large floor plant. My daughter is obsessed with Monsteras, but she lives in Georgia, and I'm in southeast Michigan near Monroe.
Iris
5 years agoHi Al,
I have exchanged emails with you regarding my fiddle leaf fig tree in the past and you were most helpful. If I may, I would like to make a suggestion- not a growing suggestion- but a "presentation" suggestion. I spent 36 years in publishing, starting as an editor. I would love to see you add heads and subheads to your commentary to keep your audience engaged with your thoughtful and educational tips. As I read your introduction and then your focus on discrete topics, like watering and soil, I thought it would be most useful for your readers to not necessarily be required to read your entire piece but instead read the sections most applicable to their question. This is not meant as a critique but rather I am offering to help you reach as many folks as you can with your approach to helping container growers. You appear so earnest and eager to share what you have learned, and write so very clearly, I would not want to see you lose any readers.
Iristapla (mid-Michigan, USDA z5b-6a) thanked Iristapla (mid-Michigan, USDA z5b-6a)
Original Author5 years agoI'm always eager to read any constructive and thoughtful critiques anyone is willing to offer; and by thoughtful, I mean comments like yours that are the result of spending some time in reflection before sharing a thought. Please help me understand whether you are referring to this thread in particular or my offerings in general, and perhaps you could give a brief illustration of what you mean? I'm always open to and appreciative of any suggestions that might make it easier for others to understand and apply the info I provide. Thank you.
AlSergey Varlamov
5 years agoHi Al - BTW, a while ago it was mentioned on this or your other forum that you intended to write a book about container soils. Is it still your plan? Any progress at all? I would love to have all your thoughts on soils in one place. Cheers
tapla (mid-Michigan, USDA z5b-6a)
Original Author5 years agoThank you, Sergey. I appreciate the interest and the kind comments. I've prepared an outline, and sort of planned that as a project for when I retired, but my brother/partner was diagnosed with a terminal illness last fall and I had to change my plan to retire at the end of '17. As things stand now, I'll have to keep babysitting the business to make sure it remains an asset until I can sell it. If I can hold on to my sanity and cognitive faculties (I'm getting to be too old to be doing the work that required 2 men working at multi-tasking), I'll get started on it at some point in the not too distant future - hopefully.
Al
Iris
5 years agolast modified: 5 years agoHi Al, this is Iris. I was referring to your 2011 "Growing for Beginners" post when I mentioned adding heads. I thought it was so informative and had not read it before. I added some heads and broke out some of your paragraphs so the text is broken up a bit and more digestible. I don't know however how to attach a word document to this forum.
I will try to copy and paste as much as will fit here as a comment. I hope it doesn't put off your following. Once you review this let me know and I will delete it so it doesn't distract your readers. The editor who will work on your book when you get to it will do much more but this is a taste of how it could work!
An Overview for Beginners
color>size>My hope is that this thread becomes a gathering place for beginners and the experienced alike, a place where reliable information that is rooted in sound science and horticulture can be found. We will see how that 'gathering' part goes, but I have enjoyed enthusiastic participation on many of my other threads on this and other fora, so I am optimistic.
What I Can Offer (or you could retitle Why I do What I do or Some Background)As I consider what I am going to share with you and how to go about sharing it, I am compelled to offer some background that will hopefully allow some degree of comfort in placing some measure of value on my commentary. I enjoy the growing experience tremendously. I have worked hard toward increasing my skill level for more than 20 years, and I look at sharing what I have learned about the growing sciences as a natural extension of the enjoyment I get from nurturing plants - sort of nurturing people who nurture plants. I am invited to lecture frequently in the mid-MI area, and occasionally beyond. I lecture, conduct workshops, and do demonstrations on a variety of subjects related to growing, but most frequently I talk about things related to container culture, with maintaining houseplants being one of the most requested topics. I also enjoy participating here at Garden Web and at another popular garden forum sites. Hopefully we will be using some links to some of my other offerings here that will help you share some of the confidence others have shown in the reliability of my offerings. Those that know me know I am not after recognition or glory, I simply feel I can help any beginner with a willingness to learn and apply the newfound information, and I get a large measure of personal satisfaction from the feeling I may have helped someone along the path to becoming a better grower.
Container Growing: Doing What is Best for the Plant, Removing LimitationsThe first challenge is to offer information that a beginner can digest, and in such a way that he or she feels it is important enough to act on. I am first going to flesh out the main issues that, if understood, will make anyone a better grower and hope I have created enough interest that there will be plenty of questions so I can go into greater detail in the answers. For what it is worth, I tend to look at growing anything in containers from the perspective of what is best for the plant, not what is best for the grower. Far more often than not, the two ideas are mutually exclusive, so if grower convenience is a large priority of anyone reading this, there is not much sense in reading on. Growing well does take a little thought and a little effort.
The houseplants we grow are perennials nearly all, capable of growing for many, many years and of being passed from generation to generation. With attention to the areas I will cover in this post, you will discover that you can maintain your plants in good health for as long as you continue to commit to providing favorable cultural conditions. Your plants are all genetically programmed by Mother Nature to grow well and look beautiful. It is only a lack of knowledge and skill in the area of providing the cultural conditions they prefer that prevents them from growing to their potential. That sounds harsh, but it is the truth.
I have never seen anyone other than me discuss growing plants in containers from this perspective, that is (and it bears repeating) your plants are already genetically programmed to grow well and look beautiful, but it is up to you as a grower to eliminate the limitations so often associated with growing in containers. This post is about isolating some of the factors that are commonly the most limiting and helping you to reduce the limiting effects. For more information on the concept of limiting effects, do a search using the words "Liebig's Law of the Minimum" or follow this embedded link to How Plant Growth is Limited additional discussion.
Choosing SoilGrowers should realize that the most important choice they will make when establishing a new planting or when repotting is their choice of soil. A poor soil is probably behind more than 90% of the issues that growers come to the forums seeking remedial help for. Collapsed or dead plants, spoiled foliage, insect infestations, disease issues are all symptoms usually traceable directly or indirectly to a poor soil. This is so important to understand, that I will devote the bulk of my effort toward making it clear why I offer this contention.
The Importance of LightLight is extremely important to plants. Plants make their own food, using water, CO2, and energy from the sun. Inadequate light means the plant cannot make enough food to grow to the potential for which it was genetically programmed. I will not go into great detail about light because when it comes to houseplants; you either have good light or are forced to deal with the limiting effects of inadequate light. If the thread finds favor, we can discuss supplementing light and how to prune to help compensate for the leggy appearance caused by insufficient light, or explore other topics of interest relating to light.
Supplementing NutritionNutrition supplementation is a requirement for normal growth and good health when growing plants in containers. In the earth, many of the nutrients are supplied by minerals in the soil. Container soils usually have no mineral component (and it is best that they do not in most cases - more later), and the soil components break down so slowly and are washed from the soil so quickly that deficiencies are virtually assured if you do not fertilize. Choice of fertilizer is also an important consideration, as we will see.
Repotting versus Potting UpThat there is a difference between the two operations is a concept foreign to most hobby growers. One of the practices ensures your plants will at least have the opportunity to grow to their genetic potential within the limits of other cultural conditions; that would be repotting, with its accompanying root maintenance, complete or partial bare-rooting, and a change of soil. Potting up, on the other hand, only temporarily allows the plant to grow a little closer to its genetic potential before root congestion and a diminished number of fine roots quickly returns the plant to the state of limited growth and vitality it was experiencing before potting up.
Watering Best Practices and the Significance of AirWatering habits - extremely important and inextricably linked to soil choice, which is why I saved it until the end of this, the short list - so it would lead me back to the most important consideration - the one most apt to determine the difference between frustration and a rewarding growing experience.
Air is as important as water in all soils plants are to be grown in. Plants absolutely love plenty of air in the root zone, and rebel very quickly at too much water in the soil. I am going to describe what happens when you water plants growing in a soil that retains too much water. There are actually two possibilities.
The first is, you water, and a part of the soil near the bottom of the container does not drain. This water has a name, it is called 'perched water', so named because it 'perches' (like a bird) in the soil above the pot bottom. This excess water is critically important because it very quickly begins to kill roots growing near the bottom of the pot - within hours. The first roots to die are the roots that do the lion's share of the work - the very fine roots often referred to as 'hair roots'. The longer the soil remains saturated, the larger the diameter of the roots killed. When air finally returns to this once saturated soil, roots can only then begin to regenerate. This takes energy and is extremely expensive for the plant in terms of energy outlay. During the cyclic death and regeneration of roots associated with excessively water-retentive soils, the plant is actually forced by chemical messengers that tell it to 'grow roots', to direct energy that would have otherwise gone into growing more leaves, branches, blooms, fruit, or just increasing the overall mass of the plant, to replacing the lost roots.
The second thing that might happen when you water if you are using a water retentive soil is, you adopt the practice of watering in 'small sips' so the soil remains damp instead of wet; this, to guard against root rot. It makes sense to only give the plant a little water at a time so the soil never gets soggy - right? That might be a workable option if you have the luxury of using water that has been processed through a reverse osmosis water filtering system, or if you are watering with distilled water, but regular tap water has things dissolved in it, like magnesium, calcium, iron, sulfur, and others. If you water in 'sips', these dissolved solids remain in the soil and build up over time. This has an impact on the plant's ability to absorb water and the nutrients dissolved in water. To illustrate the potential impact these dissolved solids have on a plant, picture in your mind what curing salt does to ham or bacon. It literally pulls water from the cells & dries out the meat. Any solutes (anything dissolved) in the solution surrounding plant roots can have the same potential effect on plant cells. It can make it difficult for plants to absorb water and nutrients, it can make it impossible, and in some cases can actually reverse the flow of water so it moves OUT of cells, effectively collapsing and killing them. We commonly call this 'fertilizer burn', but it does not necessarily have to result from an over-application of fertilizer. When people come here wanting a remedy for foliage that is dying, with dried edges & tips, almost always it is the result of over-watering exacerbated by water-retentive soils and the accompanying limitation that has on root function and metabolism, or as a result of the presence of a high level of dissolved solids from fertilizers and tap water having accumulated in the soil making it difficult for the plant to take up water. Both are so closely related to poor, water-retentive soils we can say the problem is inherent if not addressed directly.
Misting cannot correct a problem related to over-watering or a high level of solutes in your plant's soil. Low humidity can be a contributing factor to the common symptoms of necrotic (dead) leaf tips and margins (edges), but for the actual cause, look to impaired root function from over-watering or a high level of dissolved solids in the soil. BOTH of these conditions are nearly always linked to a poor soil. Misting raises humidity for a few minutes, but there are almost 1,500 minutes in a day. Raising humidity for 10 of the 1,500 has virtually no impact on the plant's ability to keep foliage hydrated. If you have foliage with burned leaf tips and margins, you should look to the soil and the state of root health for the cause.
When using water-retentive soils, it seems almost as though we are on the horns of a dilemma. If we water generously, we risk the soil remaining saturated so long it causes root rot, or at a minimum - impaired root function. If we water sparingly, in small sips, we risk an accumulation of dissolved solids from tap water and fertilizer solutions in the soil - so what to do? Well - I think we should look at an option that solves both issues and makes things much easier for the grower, while also providing the grower with considerably more latitude when it comes to watering and fertilizing.
Selecting the Right SoilThe factor that determines how water retentive and difficult a soil is to grow in, is the size of the particles it is made from. The smaller the particles - the greater the water retention and the greater the degree of difficulty for growers. Soils made of any combination of peat, coir, compost, sand, topsoil, and other fine particulates are going to be very water retentive, which we know is undesirable from the perspective of the plant, and they cannot be suitably amended to correct drainage or the height of the perched water by adding perlite or other drainage material. If anyone disagrees with that statement, please ask for an explanation before mounting an argument or offering individual observations. Adding perlite to soils reduces the overall water retention of the soil, the reduction usually being a plus, but it does nothing measurable for drainage (flow-through rates) or the height of the perched water table, the later being the critical consideration when it comes to a healthy root zone.
Soils made of a high % of pine bark or other inorganic particles will have plenty of large air spaces called macropores. These are pores that will not hold water, only air, even when the soil is as saturated is it can be. They are critical to a healthy root zone. If you build a soil with plenty of air space, it hardly matters what the soil is made from. What is important is how the soil is structured. I will grow a perfectly healthy plant in a bucket of broken glass on a dare and a wager if anyone is interested in taking me up on it. If you have a soil with a healthy structure, a good nutritional supplementation program, and have good available light, the rest is so easy anyone can do it - honest. I have seen it happen over & over and over again. You will not go wrong if your primary focus is providing a healthy - a truly healthy environment for roots. Roots are the heart of the plant. Roots come first. If you cannot keep the roots happy, there is no chance you can keep the rest of the plant happy. That was a paraphrased quote from Dr. Carl Whitcomb, PhD, who wrote the bible on "Plant Production in Containers".
This ends the beginning discussion about soils. Until you are able to grow plants, the growth rate and appearance of which you are happy with, focusing on removing the limitations placed on your plants by soil choice will almost always constitute the best use of your energies. After reading this far, if nothing else, I hope you take that concept from this offering. It is the most important point and the best piece of advice I can give you. If you are interested in knowing HOW to make soils that will help you remove the limitations, now is the time to ask.
Fertilizing Your PlantNutrition is an area that is very misunderstood when it comes to container culture, but it is actually very easy. It is also very easy to become confused because there are so many numbers that represent different fertilizer NPK percentages and so many different kinds of fertilizers. I will need to use some numbers, but I think an understanding of NPK percentages as opposed to fertilizer RATIOS is important. NPK %s tell us how much (N)itrogen, (P)hosphorous pentoxide, and (K) potassium oxide (the symbol for potassium is 'K') are in a fertilizer by weight. So a fertilizer that is labeled "All Purpose 24-8-16" is 24% nitrogen, 8% phosphorous, and 16% potassium. 12-4-8 is also a common "all-purpose" fertilizer. It has exactly half the nutrients of 24-8-16, but both are 3:1:2 RATIO fertilizers.
Ratios are a way of describing the amount of nutrients in a fertilizer as they relate to each other. Why is this important? It is important because we know that on average, plants use about 6 times as much N as P, and they use about 3/5 as much K as N, and now I will tell you how we can use this information to our plant's advantage.- The ideal way to fertilize is to supply fertilizer at the same ratio in which plants use the nutrients. The reason is because optimal growth and vitality can be had only when nutrients are in the soil at overall levels low enough that it does not become difficult for plants to take up water and nutrients dissolved in that water. Remember what we said above about a high level of soluble in the soil making it difficult for roots to absorb water and nutrients? Nutrients also need to be present at levels high enough to prevent deficiencies. If we think about it for a second, we can see that the best way to achieve this end is to supply nutrients at the same ratio in which they are used.
- I noted that the NPK percentages actually tell us how much phosphorous pentoxide and potassium oxide are in a fertilizer so I can show you how fertilizer manufacturers arrived at a 3:1:2 ratio as their "all-purpose" blend. Only 43% of the P reported on a fertilizer label is actually P, and only 83% of the K reported is actually K. Once you apply these factors to any of the 3:1:2 ratio fertilizers (24-8-16, 12-4-8, and 9-3-6 are all popular 3:1:2 ratios), you will see they supply nutrients in almost exactly the same ratios as the average that plants actually use, and these fertilizers are excellent at keeping the overall level of solubles as low as they can be without creating nutritional deficiencies.
- There is no need to use 'specialty' fertilizers; and many specialty fertilizers, like the advertised "bloom boosters" with up to 30 times more phosphorous than a plant could ever use (in relation to the amount of N used), can be (almost always are) moderately to severely limiting because the excess nutrients are a limiting factor.
- The question often arises, "Should I use a synthetic or an organic fertilizer"? The answer is: "Use whichever you wish"; but the qualifiers are: Organic fertilizers are actually more accurately called soil amendments. They are mixed into the soil in the hope that at some point soil organisms will digest them and make them available in elemental form so plants can absorb them. The problem with that approach is that the populations and activity levels of soil life populations in containers are erratic and unreliable, making the delivery of nutrients from organic sources just as erratic and unreliable. What you apply today, may not be available until next month, and there is no way to determine what residual amounts of which elements remain in the soil. Soluble fertilizers like Miracle-Gro and others are completely available as soon as applied, and we know exactly what our plants are getting. They are simply much easier to use and deliver nutrients much more reliably than other fertilizer types. You can lump controlled release fertilizers like Osmocote and others in with the soluble synthetic fertilizers. With them, you get an extra measure of convenience but sacrifice a measure of control. As with all fertilizers, it is important to note the NPK percentages to be sure you are supplying the fertilizer in a favorable ratio if you want your plants to be all they can be.
When it comes right down to what occurs at the molecular/cellular levels, plants take up nutrients in elemental form. They cannot absorb the nutrients that are locked in the hydrocarbon chains that make up organic fertilizers until the molecules are broken down into their most basic elemental form. At that point, all nutrients are taken up as salts, and all are in the same form, no matter if they came from compost, a dead fish, or a hose end sprayer. Plants could care less where their nutrients come from, as long as they have a constant supply of all essential nutrients at all times.
It is not going to kill your plants if you use a fertilizer with a less than favorable ratio because plants tend to take the nutrients they need from the soil (solution) and leave the rest, but it is important to understand that it is 'the rest' that constitutes a limiting factor; so avoiding unnecessarily high levels of any one nutrient or nutrients whenever possible is to your (plant's) benefit.
Container Growing is Not Like Growing in Your GardenIt is important to understand that growing in containers is markedly different than growing in gardens. On a scale of 1-10, with 1 being growing in the garden and 10 being hydroponics, gardening in containers is much closer to hydroponics than gardens, getting a rating of somewhere around 7 or 8. This is why many of the practices that serve us so well in our gardens do not work well in containers.
One area that is often a sticking point is the idea we need to "feed the soil". While that is an admirable and productive approach to gardening in the earth, container soils are more about their structure than about any nutrients they might supply. If you concentrate on your soils structure and durability, and more specifically its ability to hold plenty of air, you will greatly increase both the probability of consistent success and the margin for grower error. Well-aerated soils are easier to grow in and offer much greater opportunity for plants that will grow as near to their potential as possible.
Protecting the Root SystemAs noted above, most growers draw no distinction between 'repotting' and 'potting up'. I have spe
tapla (mid-Michigan, USDA z5b-6a) thanked Iris
RoseMe SD
2 years agoCould you explain and show (with photos) us how to cut or trim roots properly when transplanting a potted tree to another pot, or to the ground?
Michele Rossi
last yearHi, @tapla (mid-Michigan, USDA z5b-6a). As you know, for some months now I have been reading what you write with great attention and admiration. Next year I would like to try my benjamin root pruning, even if it terrifies me as you can imagine. I say next year because I understand that it is an operation that must be performed at the end of March, right? I remind you that I live in southern Italy. On other sites I have read that the pruning of the roots serves to contain the size of the plant: is it true? Will I get smaller potted plants?
tapla (mid-Michigan, USDA z5b-6a)
Original Authorlast yearHi, Michele. Thanks for the kind words. In case you haven't read the piece I wrote about Long Term Care of Trees in Containers, you now have the link.
Next year I would like to try my benjamin root pruning, even if it terrifies me as you can imagine. I say next year because I understand that it is an operation that must be performed at the end of March, right? Where you live, ficus other than the hardy fig (Ficus carica) would best be repotted in late May. Tropical trees are best repotted in the month before their most robust growth, which ensures the fastest recovery (about 2 weeks in most cases). Timing heavy work like hard pruning and repotting so it coincides with the strongest part of the growth cycle is easier on the plant and reduces the chance of disease pathogens or insects gaining a toehold during recovery. If someone decides to repot between late fall and late spring, recovery could take months rather than weeks; this, because of a significantly reduced ability to make food during photosynthesis. Plants have natural rhythms (search Circadium and endogenous rhythm) that allow us to take advantage of their strong periods and make allowances for the slower (in terms of growth) part of the cycle. On other sites I have read that the pruning of the roots serves to contain the size of the plant: is it true? Will I get smaller potted plants? All else equal, plants in containers that are regularly root pruned have the potential to grow much larger than plants only potted up. So it's a myth or fallacy that root pruning itself limits the size of containerized plants. If, all else being equal, we have two plants from the same genetic source, one of which was potted up a pot size at the same interval the other was repotted, after a period of 10 years the plant that was repotted regularly would be many times larger than the plant that was potted up. If asked to make a guess at how much larger the repotted plant would be after 10 years, I would say at least 5X larger. Now, imagine the plant that wasn't even potted up - just left to languish in a too small pot for 10 years. In most cases they would be in the compost pile after about 5 years, or still hanging on by a thread ...... and we haven't even considered the difference in vitality levels and eye appeal.
Repotting sequence of a Ficus benjamina 'Too Little'
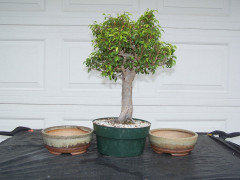
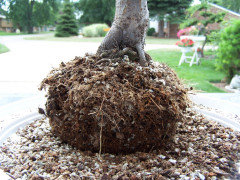
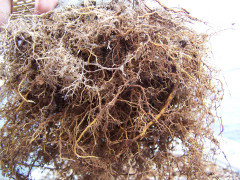


Al
Michele Rossi
last year@tapla (mid-Michigan, USDA z5b-6a), thanks a lot. Just a curiosity: your ficus in the last photo has less lightning than in the first photo. Did you prune the branches or did it lose its leaves due to stress from root pruning?
tapla (mid-Michigan, USDA z5b-6a)
Original Authorlast yearBecause that particular root pruning session was very severe, I pruned the top back so the entire tree wouldn't collapse and no important branches would be shed.
People are fond of repeating the conventional mantra that you shouldn't prune the top back to balance the root to shoot ratio because the plant's food comes from the leaves, but the experience of those who repeat the mantra is limited to pulling a plant out of a pot or taking a balled and burlapped tree and dropping it into a planting hole. The root to shoot ratio of these types of plants has already been balanced through the chemical messengers that inform plant central whether or not new growth can occur and where (roots or shoots). Once we stray from the very simple act of transplanting a nursery plant, the advice might not be appropriate. After repotting many thousands of trees, I know that sometimes altering the root to shoot by removing top growth is essential to survival. Try digging up a deciduous tree from the yard in summer and transplanting it w/o pruning the top hard and see what happens. At best, the tree will randomly shed branches, and worst case is the entire organism collapses.
This is a pruning/styling sequence of a Ficus benjamina:

Tree is 30-35 years old. Started from an 8cm cup of 5 or 6 cuttings a little thicker than a pencil lead. Other cuttings were added along the way.
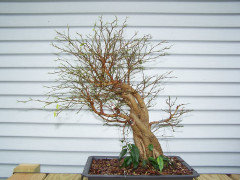
Defoliated intentionally to make pruning and wiring easier. ^^^
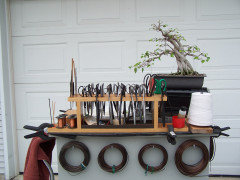
After pruning/ wiring - tree starting to push new leaves.
Al
Michele Rossi
last yearlast modified: last year@tapla (mid-Michigan, USDA z5b-6a) Can we summarize by saying that the pruning of the roots must be accompanied by an (hard?) pruning of the branches?
tapla (mid-Michigan, USDA z5b-6a)
Original Authorlast yearCan we summarize by saying that the pruning of the roots must be accompanied by an (hard?) pruning of the branches? No. Very often it's not necessary to prune the top of a tree unless the root pruning session was severe, as it was in the example above. Usually though, if you have a tree in a container you'll want to prune hard every spring to rid the tree of the long lanky growth that occurs in the dark months. The cycle starts in mid to late May with pruning off all lanky growth that occurred during winter, all the way back to last summer's growth. You'll be able to tell where that is by the short internodes. Then, let the tree grow all summer, pinching as required. In late Sep or early Oct (for you), stop all pinching and pruning and just let the tree grow for the dark months. next may, start the cycle over.
Growth shouldn't be your goal. Growth is just the means to the end, which is good health, eye appeal, and a pair of scissors/ pruners should be there in the mix somewhere. No one actually wants to grow an unsightly tree, but that's what happens when you bring a tree indoors where the light is so much different than outdoors where light works mostly as the primary stimulus guiding the tree's shape. Indoors, you're the stimulus.
So for tropical ficus, hard pruning or the regular maintenance pruning will/should always be done annually whether or not you repot; so whenever you repot, you'll be pruning fairly hard as part of regular annual maintenance. Repotting will be done about every other or every 3rd year. In the years I know I'm going to repot, I do my pruning first; then, when the tree starts pushing new growth, I root-prune. This seems to speed up the recovery process by several days or maybe a week, Growth of the new leaves and branches will stop after you repot, then come back on line as the reduced root mass grows enough to catch up with top growth.
Al


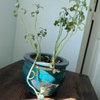
Laurie (8A)