


I've been lurking on and off for a while.
bigoledude
10 years ago
Sort by:Oldest
Comments (24)
Related Stories

SMALL HOMES16 Smart Ideas for Small Homes From People Who’ve Been There
Got less than 1,000 square feet to work with? These design-savvy homeowners have ideas for you
Full Story
REMODELING GUIDESHow to Remodel Your Relationship While Remodeling Your Home
A new Houzz survey shows how couples cope with stress and make tough choices during building and decorating projects
Full Story
FEEL-GOOD HOME12 Very Useful Things I've Learned From Designers
These simple ideas can make life at home more efficient and enjoyable
Full Story
LIFE10 Ways to Keep Your Home Safe While You're Traveling
Set off on your trip with peace of mind, knowing you've taken the right steps toward keeping your home secure
Full Story
DECORATING GUIDESThe Dumbest Decorating Decisions I’ve Ever Made
Caution: Do not try these at home
Full Story
LIFEMake Money From Your Home While You're Away
New services are making occasionally renting your home easier than ever. Here's what you need to know
Full Story
SELLING YOUR HOUSE9 Tips for Living a (Semi-)Normal Life While Your Home Is Being Shown
Preparation, routine and treats help you make the house you’re selling presentable at a moment’s notice
Full Story
HOME TECHHigh-Tech Tips for Securing Your House While You're Away
Prevent burglaries when you're traveling by using the latest gadgets, apps and online services
Full Story
REMODELING GUIDESHow to Protect (Even Enhance!) Your Relationship While Renovating
No home improvement project is worth a broken heart. Keep your togetherness during a remodel with this wise advice
Full Story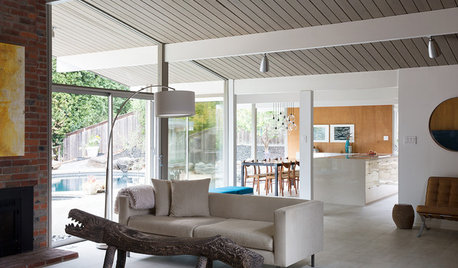
MODERN HOMESHouzz Tour: Updating an Eichler While Preserving Its Spirit
Architects and builders keep this home’s integrity intact while remodeling the kitchen, creating a master suite and adding energy efficiency
Full StorySponsored
themes
ronh4
Related Professionals
Pelham Landscape Contractors · Westwood Landscape Contractors · Arden-Arcade Landscape Contractors · El Mirage Landscape Contractors · Hoover Landscape Contractors · Kailua Landscape Contractors · Mission Bend Landscape Contractors · Pleasant Hill Landscape Contractors · Roseville Landscape Contractors · Twin Falls Landscape Contractors · Vallejo Landscape Contractors · Wethersfield Landscape Contractors · Yukon Landscape Contractors · Hawaiian Gardens Landscape Contractors · San Pablo Landscape ContractorsbigoledudeOriginal Author
ronh4
bigoledudeOriginal Author
themes
bigoledudeOriginal Author
daisy_ny6
bigoledudeOriginal Author
lisa2004
beachplant
billie_ann
Bamatufa
bigoledudeOriginal Author
billie_ann
billie_ann
bigoledudeOriginal Author
billie_ann
spfld_girl
bigoledudeOriginal Author
gammagirl
gammagirl
billie_ann
Mertie