

Duraforce Re-jetting Instructions Part 2
fordtech
18 years ago
Sort by:Oldest
Comments (96)
Related Stories

HOUZZ TOURSMy Houzz: Jet-Setting Style Lands Smoothly in Portland
Furnishings from around the world give an Oregon home a well-traveled vibe that packs in personality
Full Story
HOUSEKEEPINGWhy Cleaning Window Screens Should Be Part of Your Winter Strategy
Dirty mesh blocks light, heat and views. Learn how to keep screens looking good and if they should be put away until spring
Full Story
LIFEMake Money From Your Home While You're Away
New services are making occasionally renting your home easier than ever. Here's what you need to know
Full Story
LIFERelocating? Here’s How to Make Moving In a Breeze
Moving guide, Part 2: Helpful tips for unpacking, organizing and setting up your new home
Full Story
BATHROOM DESIGNDreaming of a Spa Tub at Home? Read This Pro Advice First
Before you float away on visions of jets and bubbles and the steamiest water around, consider these very real spa tub issues
Full Story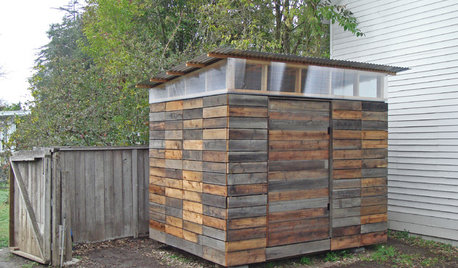
STORAGE2 Weeks + $2,000 = 1 Savvy Storage Shed
This homeowner took backyard storage and modern style into his own hands, building a shed with reclaimed redwood and ingenuity
Full Story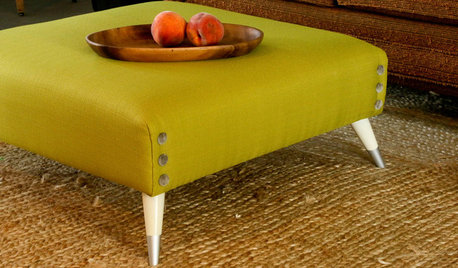
DIY PROJECTSTurn a Shipping Pallet Into a Stylish Ottoman
Get the step-by-step instructions for upholstering your own mod living room centerpiece
Full Story
COFFEE WITH AN ARCHITECTHow to Design (and Live) With Meaning
Design and architecture have the power to make the world a better place. These 10 instructions can help
Full Story
BATHROOM DESIGNConvert Your Tub Space to a Shower — the Fixtures-Shopping Phase
Step 2 in swapping your tub for a sleek new shower: Determine your mechanical needs and buy quality fixtures
Full Story
CONTEMPORARY HOMESHouzz Tour: Art and Natural Light Shine in a Contemporary Apartment
A designer helps create a peaceful and soothing home environment for a jet-setting D.C.-based professional
Full Story
Gardn_dlyte
tinkerer_gw
Related Professionals
Garden City Landscape Architects & Landscape Designers · North New Hyde Park Landscape Architects & Landscape Designers · Arlington Landscape Contractors · Azalea Park Landscape Contractors · Cambridge Landscape Contractors · Camp Verde Landscape Contractors · Holtsville Landscape Contractors · La Mirada Landscape Contractors · Lehigh Acres Landscape Contractors · East Norriton Landscape Contractors · San Pablo Landscape Contractors · Carlsbad Carpenters · Deerfield Beach Carpenters · McHenry Carpenters · Poway Carpenterstinkerer_gw
dougmac
fordtechOriginal Author
dougmac
fordtechOriginal Author
tom_p_pa
dougmac
mowsizlak
tom_p_pa
lawnmowerdan
dougmac
gmeyer10
enosli
1saxman
tom_p_pa
tinkerer_gw
fordtechOriginal Author
tom_p_pa
tinkerer_gw
pete_p_ny
jsouth3
rdaystrom
AJY16
rangers_275
1saxman
pete_p_ny
AJY16
HZR03
lawwnbboy
bigal_mo
lawwnbboy
pete_p_ny
lawwnbboy
pete_p_ny
lawwnbboy
lawwnbboy
snuffyinatl
lawwnbboy
lawwnbboy
pete_p_ny
bigal_mo
lawwnbboy
stevanrk
tom_p_pa
rls39
mis4mike
bbstacker
bbstacker