


My Riga Greenhouse (lots of pics)
I have been wanting to post pictures of my greenhouse for quite some time now, and 'loveitgreen' has inspired me to do so.
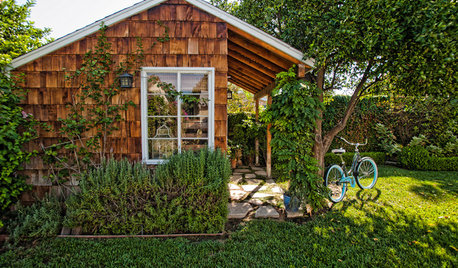
So here we go - a tour of my beloved Riga, built in 2008.
It's 10 by 14, with double-wall polycarbonate all around and 2 automatic roof vents. We have electricity and water inside, but we don't heat it.
Comments (96)

funnylady
12 years agolast modified: 9 years agoBe sure to post some photos for us whrn you do put it together.
stressbaby
12 years agolast modified: 9 years agoKarin,
I enjoyed your post, sorry to not have seen it sooner. I have a couple of questions for you.
1. What is your water source? In one pic I see a white hose. How do you run that water into the GH?
2. The GH is not attached to the house. Did you ever consider insulating that wall?
Thanks. Very nice setup.
Robert
Related Professionals
West Milford Landscape Architects & Landscape Designers · Otsego Landscape Architects & Landscape Designers · Goodyear Landscape Contractors · Pottstown Landscape Contractors · Bainbridge Island Landscape Contractors · Berwyn Landscape Contractors · Choctaw Landscape Contractors · Dedham Landscape Contractors · El Sobrante Landscape Contractors · Inglewood Landscape Contractors · Los Banos Landscape Contractors · Northbridge Landscape Contractors · Paterson Landscape Contractors · Waipahu Landscape Contractors · Wilsonville Landscape Contractors
karin_mt
Original Author12 years agolast modified: 9 years agoRobert,
The water line exits the basement of the main house via a small hole in the foundation, passes through a very short trench, then comes up into the greenhouse. Inside the basement there is a shut-off valve and a drainage port so I can empty the line during cold weather. However last year I forgot that step and was greeted with a broken pipe in the spring, duh.
The original plan was to insulate that north wall but I just haven't. I was considering using the reflective bubble wrap stuff on the inside of the wall, but I don't know, that just seemed unappealing somehow. I'd prefer to insulate the outside wall and keep the inside cleaner looking. I am open to suggestions because this would be an obvious way to keep things warmer in there. Got any recommendations?
thanks!
KarinDavid Shawver
12 years agolast modified: 9 years agoKarin
We started this weekend to put the base foundation together and are having the landscaping crushed stone, sand and pea gravel delivered this week. I was wondering how wide your walkway is. From the pictures it appears to be about 4 feet.
I was thinking of going with a 2-3 foot walkway using concrete pavers. Any cons with that idea? The weather here has finally started to drop below triple digits.karin_mt
Original Author12 years agolast modified: 9 years agoYour idea for a walkway sounds right on to me. Our walkway is 32" wide, made with concrete pavers, just as you are thinking of using. On either side of the pavers is a 1" wide trex board that separates the walkway from the beds.
I couldn't go much narrower, as it's already hard to walk through there right now with the tomato plants and cucumber vines making things pretty crowded. As it is, it's a bit hard to reach the back of the beds, but it works pretty well, especially if I put in a few strategically-located stepping stones to allow me to reach father back.
Glad to hear that the weather is finally cooling down and allowing you to get to work on this fun project!
Keep us posted!
David Shawver
12 years agolast modified: 9 years agoThank you Karin. Your photos and assistance are very much appreciated. We've had this greenhouse in storage for awhile now just hoping for some rain and cooler temperatures. Were still at high risk for flash fires. The Bastrop fires were only a few miles from us. Rain here has been scarce for the last year. I think Texas is returning to the dust bowl years. There is a small chance of rain this weekend which hopefully will make the digging easier. Right now the ground is like concrete.
David Shawver
12 years agolast modified: 9 years agoKarin - I was reviewing you pictures today and liked the way the electric and water was installed. I was wondering what you used for the post that allows you to hang the watering hose on it? It was hard to tell from the pictures.David
karin_mt
Original Author12 years agolast modified: 9 years agoHi David,
Sorry for my delayed response. I have been away from the forum for a week or so.
The water comes in through the floor in a pvc pipe, which then makes a 90-degree bend to form a vertical pipe. A nice cedar 4x4 forms the rigid post, with the pvc attached to that with brackets. At the top of the pvc is a standard brass hose bib. I just coil the hose and rest it on the hose bib. The hose is short (25') and lightweight, so I can rest it on the hose bib. I meant to get a nicer hanger, but it turns out this works fine.
Last winter I left water in the pipe and it froze and broke, so when I had it replaced in the spring I added a junction down at the floor for the misting system. This is a nice addition. Now the mister has its own connection and I don't have to screw it on/off the hose bib, which was always awkward.
On the electricity, I had only 2 outlets put in and 4 would be better (lights, fans, heating pads, etc). So that is one thing I would do differently. The electrical box is at the back of the greenhouse while all the controls like light switches are at the front. So I wind up with lots of extension cords and adapters, and that's not a very clean arrangement.
That said, it's not exactly a hardship either. :) It's wonderful to have power out there!
charleslou23
12 years agolast modified: 9 years agosorry if this was mentioned, but i didnt see a heater, just a fan?
karin_mt
Original Author12 years agolast modified: 9 years agoRight, no heater. We never intended to heat it in the winter, but originally I was planning on getting a small heater to get though the occasional cold night. Turns out that hasn't been necessary. It retains heat very well, I cover things inside with blankets as needed and I have 15 or so 5-gallon buckets of water for some thermal mass.
There is also 4-inch thick, 16-inch deep styrofoam insulation all around the perimeter. I didn't think it would stay so warm in there but it does!

Julia WV (6b)
12 years agolast modified: 9 years agoKarin: I'm popping this thread back up to inquire about your base foundation. I see you wrote that you dug down an additional 16 inches and placed styrofoam around the perimeter. Did you add any gravel for drainage? Is so, how many inches? I assume then you backfilled with the dirt you took out since you have the planting beds on the inside of the greenhouse. Hope my inquiry makes sense.
Julia
karin_mt
Original Author12 years agolast modified: 9 years agoHi Julia,
We did not add any gravel for drainage, we have good drainage here and the ground slopes gently away from the greenhouse.
For the beds inside, I took out 1-2 wheelbarrows of dirt from each bed and replaced it with a nice mixture of peat moss, sand and compost. It drains just fine. Under the paver flooring I put down a couple inches of sand.
Gwrace used gravel for backfill due to poor drainage where he is, so you could follow up on his recent thread to get more details.
I hope that helps!
Karingreenhouser
12 years agolast modified: 9 years agoGorgeous tomatoes. What kind are they? The don't quite look like Romas.
karin_mt
Original Author12 years agolast modified: 9 years agoThose tomatoes are Super San Marzano hybrid. Still have several boxes of them on the countertops in various states of ripening - they are mightily productive!
alicate
10 years agolast modified: 9 years agoHow are you still liking this greenhouse? I want to get a Riga IV hopefully this summer.
karin_mt
Original Author10 years agolast modified: 9 years agoTotally! I'd buy another in a heartbeat, except in a larger size. I've determined that whatever size you have, it's a little bit too small.
Go for it!

vtgrower
10 years agolast modified: 9 years agoHi, I was really excited to read your post since I am considering buying a Riga V Greennouse 9'8" x 17'8". You gave a lot of great information that makes me feel more confident with my decision and helped me with ideas such as adding insulation to the foundation frame. I am guessing you put up the greenhouse yourself since you seem quite handy. Did you find that relatively simple to do? I am really looking forward to extending my garden season here in Vermont. I will post pictures when we get ours up and organized - hopefully late spring. Thanks again for all the wonderful pictures and information.
karin_mt
Original Author10 years agolast modified: 9 years agoHi Jmiles,
Great! Vermont is definitely a climate that would be made easier with a greenhouse. That larger size is the one I wish I had now, so I approve of your choice.
Yes, we installed the greenhouse and my husband is extraordinarily handy (lucky for me). We just built another one this fall for friends who are also quite handy and we pulled it off in a day. That said, it is tricky. There are several places where the instructions are not clear or where the orientation of the pieces could be interpreted in a few different ways. But Riga makes a video which really helps. I watched the video several times and wrote down notes before we even started.
But a couple weekends' worth of hard labor is a no brainer compared to all the pleasure you'll get from having your greenhouse. Enjoy the planning/dreaming stage, which is a lot of fun.
Do keep us posted when you gear up in the spring!
Karin

4greenhouse
9 years agoHi Karin, I gather you are from Bozeman, is that right? I also live in Bozeman, our elevation is 4510'. I have been busy tonight ready your lengthy thread on your GH. It's very informative. I have a 10x12 Harbor Freight and this is my first year gardening so I can use all the help I can get! This past week I have started my trays of seeds. My plan is to transfer them into big bins (6",8", 24" deep) according to the plants requirements for roots. I don't have an outside garden so I will be leaving them in the GH until I can eat them. In our area, when do you think I should be able to transplant them into the bins which will stay in the GH 24 hrs a day? Right now I've been carrying the seed trays out there during the warm days and bringing them into the house at night. I do not have electricity in it and will not heat it. I have thought about purchasing a 55 gal plastic barrel to use as a heat sink. I am in the process of ordering 40% shade cloth (recommended for veg). Sorry I have so many questions! Any help is greatly appreciated.
User
9 years agoKarin, so glad someone brought this one back to the present. I had it in my clippings file, which probably has disappeared sad to say. Your Riga continues to be impressive. I wound up restoring our cement block garage into my Teahouse, with an entire new roof structure which includes an 8 x 20 polycarb insert for light. I'd wanted to install solar panels on the top, but with it facing east/west not north/south, and neighboring trees blocking sunlight in the winter months, I had to make other choices. Good to have you and other greenhouse folks posting.
karin_mt
Original Author9 years agoNice timing to revisit this thread, now that many of us are getting things up and running for the season.
Thank you Moccasin for the kind comments. Sounds like you have successfully completed your project, nice work!
4Greenhouse - hello neighbor! A greenhouse is so nice to have around here and I bet you will love yours. I plant my warm season plants permanently in the greenhouse in early to mid May. Since they are small, they are easy to cover in case of a late cold snap. But I've never even had a close call, so I bet I could go earlier. This year is so warm so I am going to try a bit earlier. While the plants are waiting to be planted into your bins, you might consider potting them up into larger pots, if their size warrants it.
For cool-weather crops, you could put those in their bins now.
If you send me a message (which I think is possible via the Houzz interface) I can send you a timetable of greenhouse activities for our region. It's part of an article I wrote for Zone 4 magazine last year.
Hope that helps!
hudson___wy
9 years agoIt was great and appropriate for me to review this thread today Karin! I have to say that when I started my GH back around 2010 like 4GH is doing now - it was this thread and others with such awesome pics and information that you post - that motivated me to figure out how to greenhouse successfully - like you! I hope you will continue to participate and let us share in your success and methods!
Are you planting any new tomato varieties this year? Please tell me which varieties you plant most every year now in your GH. I am trying to plant some early tomato varieties outside the GH with frost protection - that will be interesting here in zone 3 - I think you plant some tomato plants outside you GH in zone 4? If so, what varieties do you plant outside?
karin_mt
Original Author9 years agoThanks for the encouragement Hudson! I feel the same way about your amazing photos and innovations that you report on here.
Here's my tomato lineup for 2015:
Inside the greenhouse
Granadero -for sauce, resistant to blossom end rot, not as tasty as San Marzanos, but healthier and therefore more productive.
Sweet Baby Girl - cherry, madly productive, and I have one plant every year without fail.
Ernie's Plump - heirloom, super delicious for sandwiches or sauce. Not as productive as hybrids, but still worth it.
Plus one wildcard for early, fresh-eating tomatoes - can be Early Wonder, Matina, or something else. I'm not sure what that will be this year. Maybe I should try Brandy Boy?
The other staple for inside the greenhouse is 'Diva' cucumbers. Cukes
just don't like our unsettled weather and I have completely given up
trying to grow them outside.
Outside
Matina, Early Wonder, and this year I'm trying Sioux because I got the seeds free with my order from Tomato Grower's Supply. Matina and Early Wonder have been very reliable for me, and they have actual flavor which seems to be rare among early tomatoes. Early Wonder stays small, which seems to work well with our windy weather.
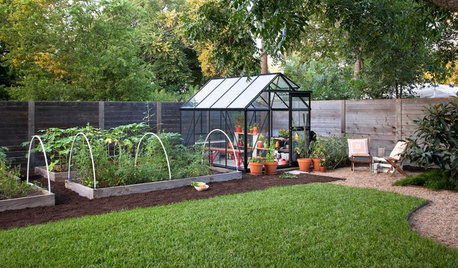
The usual place where I grow outdoor tomatoes is a special spot that is warm and sheltered. I have a stone patio around the greenhouse and small planting beds inset within the patio. The greenhouse protects the beds from winds, and the stones hold in the heat. It's a coveted spot for growing heat-loving plants. In addition to tomatoes, I grow sweet peppers there. All the other veggies go in the back yard in standard raised beds.4greenhouse
9 years agoKarin_mt.............Any luck with Whippersnapper and Ararat Flame? Both are seeds I got from Tripple Divide Organic seeds co- op in Whitefish.......grown for Mt climate
4greenhouse
9 years agoHi Karin_mt I tried everyway imaginable to message you directly and couldn't do it with your email address. You said if I did you'd send me the timetable of greenhouse activities for our region.... part of an article youwrote for Zone 4 magazine last year. My email is sappysf@mac.com. I'd really appreciate it. Thanks in advance.
karin_mt
Original Author9 years agoHi 4Greenhouse,
I'll look at my settings again, sorry about that. I'll send that article to you right now, thanks!
I haven't heard of Whippersnapper or Ararat Flame - no better way to find out than trying them (and then letting us know how they fared).hudson___wy
9 years agoDo you have any photos of your outside tomato plants? Matina & Sioux are indeterminate varieties and Early Wonder is a determinate? How do you support the plants outside and do you support the Indeterminates different than the determinates? Do you have to frost protect them in your special warm spot? Do you start the seeds in the GH? When do you transplant them outside and how old are the seedlings (6-wks)? Thanks for the info - I am trying to figure out the best methods to plant tomatoes outside in Zone 3
karin_mt
Original Author9 years agoHi Hudson,
My outside tomato supports are a simple tripod made with 3, 6-foot lengths of stout bamboo. I stick the bamboo as deep as I can get it. So far they have not fallen over, even when loaded up with a huge plant. I wind jute twine around the outside of the tripod so that the spacing between layers of jute is around 8 inches, to give branches a place to rest. By late season, the plants tend to overwhelm the tripods, but so it goes. I make the same support for Early Wonder, but it just doesn't climb up as far.
I use my trusty frost blankets for early and late freezes. I just drape the blanket over the whole structure, which works great. Early on, when I don't have the tripods up, I have shorter stakes (or even milk crates) to support the frost blankets. I use the same system in case of hail.
I start the seeds in the GH anytime from now through early April. While I wait for good planting weather (late May-early June) I keep potting them up. They are usually in gallon pots by the time they get planted outside. It's helpful if the plant is big enough to fend for itself, so to speak, with our windy and unsettled spring weather.
A new wrinkle for me is that the deer have discovered this planting spot. In the back gardens we have a fence, but not in this area. I'm not sure how to solve that. For now I'm using plastic netting, which I hate.
Here is a photo from July. There are a few heads of lettuce at the feet of the tomatoes. This photo is looking pretty attractive from the POV of this 34-degree, rainy morning here!
szut (Zone 6 - MA)
9 years agoHi Karin,
Based on your posts I've decided to get myself a Riga. I ordered (and received) the base so I can start landscaping for the greenhouse which I'll want up by late summer for use next fall (it's too late to get it set up for use this spring and I don't want to rush the job). I have a question - I see that the Rigas come with an optional 3rd window framing kit. Is that something you would recommend? I'm getting the 9'8" x 14' Riga. I prefer to be not use electricity if at all possible... How leaky are the windows in the winter and how do you stay "cool" in the summer?
How "hard" do you have to work to keep the greenhouse cool in the summer? I want to minimize electricity/water usage in the greenhouse. I'm debating if I only use the GH fall through spring and leave it as a dehydrator (sun-dried tomatoes for example) in the summer. :-) I believe that is shade cloth in the picture above?
Thanks in advance! I find your postings extremely helpful!
karin_mt
Original Author9 years agoHi Szut,
Congratulations on your Riga! You're going to love it.
Where are you located? Your climate is going to determine how much effort you'll need to put into cooling. The roof vents are great and they don't seem leaky to me. They are heavy so they close tightly and they have a rubber seal all the way around. So there's not much disadvantage to having more, aside from cost.
Shade cloth is a must, even in late spring, so I would advise that. Yes, that's white shade cloth on the west side of our GH.
For our climate (sunny, arid) I've found the best method for cooling is a misting system. It uses minimal water and no electricity. A misting system plus a fan is great too. Fans alone don't quite do the job for me. But then again, I use the GH all summer so your situation is different.
You'll figure it out as you go along. I applaud your plan to minimize electricity and water usage. I am the same way, although I do use some energy to maximize production.
Good luck with the planning!
Karin
szut (Zone 6 - MA)
9 years agoI live in northern zone 6 in eastern Massachusetts. We have a humid climate and so I worry about misting because it can increase my odds of various (fungal) diseases. But will have to look into it some more.
I believe in your greenhouse you put in an "I" shapes path where near the door and the back window you have a path along the full short sides. What do you think of that layout? Would you do anything different? I'm considering an L shaped path where only near the door on the north facing wall would I put an additional path (vs the middle walkway). What do you think my challenges might be with that layout?
I'm planning on my electrical and water at the opposite end of the greenhouse as the door against the wall with the water on one side and electrical on the other side of the walkway. Is that what you did (it looks like it) and did it work ok?
I see that you put 2" of insulation on the inside of the greenhouse - I figure you did that because of the base requires soil inside the groove to hold it in place... Did you just have the insulation peaking out on top of the soil or how did you "finish it"?
Can you install the base BEFORE the greenhouse or must the two be installed together to attach the two? (I ordered the base hoping to landscape it slowly this spring, but not put up the greenhouse until later this summer.)
Is there anything else that we should consider? We are getting the base ready to be installed...
Thank you!!!
karin_mt
Original Author8 years agoHi Szut,
Sorry, am traveling so haven't been attentive here!
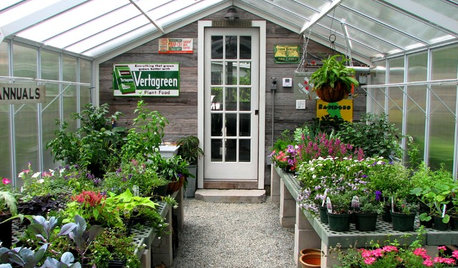
Our aisle is basically a path down the middle with a work area in the back. At the front there is just one paver's-width of border between the beds and the greenhouse walls. So it's not really a path, it's just some breathing room. That layout has been great. The only thing I'd change is to have a bigger greenhouse, lol.
With your path, would you still have growing space along either long wall? That's the sweet spot, so set up your path to maximize that valuable real estate.I like having the water at the back, near the potting bench, but I wish I had electrical outlets at the front as well. That's where the light, fan, and heat mats go, so I run an extension cord. Not ideal.
Yes, the insulation peaks out just about the soil on the inside. Yes, the soil on the outside of the foundation frame is what holds it all in place. So, where the styrofoam peaks up out of the soil, I just put a row of brick pavers on top of that to cover it and made a tidy edge at the back of the bed. Actually I think it's two rows of bricks.
Yes, you can totally put the base in first. It's a great idea to do that. It sounds like you are hitting all the key things: water, electric, and paths. Make sure to get the foundation truly level and square. Otherwise it is very difficult to slide the frame pieces on. Having someone OCD do that part is very helpful. :)
Good luck!User
8 years agokarin, what a great adventure! Would you mind saying how you prepared the beds that are in the ground? Did you add anything to the existing soil before or after planting? Those tomato plants were phenomenal! Thanks for sharing.
szut (Zone 6 - MA)
8 years agoHi Karin!
Thanks for the advice!
I like the single row of pavers in the front since I won't need walking space there. In the back with the potting bench do you have pavers under it?
Do you have water containers in the winter for thermal mass? If so where do you put it?
Do you install bubble wrap (solar pool cover) inside your greenhouse for the winter? If so how do you do it and do you have any pics?
I'm now debating convincing my husband to get the Riga IV. :-O. I want the 4 windows! ;-)
Do you have the vents on your endwalls? (I think they are Louvre ones)
Thanks again!
karin_mt
Original Author8 years agoCatkin -
I do a lot of work on the in-ground soil. Initially, I removed a lot of the poor soil that was there, and added in goat manure, sand, peat moss, and organic fertilizers like kelp meal and feather meal. That worked great for about 4 years and then we noticed declining productivity. So last spring DH removed the soil and replaced it with fresh soil from a fertile part of our yard, and I again fortified that with peat moss, compost, and Dr. Earth organic fertilizer. Productivity shot back up, and now we know we should replace the soil every so often. Makes sense, as I grow tomatoes every year with no rotation.
Szut -
Yes, the area under and around the potting bench is all pavers. I can send you some detailed pics if you like.
I have 5 gallon buckets stacked up in 4 different places: on either side of the front door, under the potting bench, and under the shelving in the way back. Probably around 20, 5-gallon buckets in total.
No bubble wrap but I'm sure that would help. I actually don't mind a bit of a break in the winter so I haven't gone to the Nth degree to promote winter warmth.
We don't have louvered vents on the end walls. We just open the front door and/or back window.
You can add extra roof vents on any Riga. But a larger model hardly seems like a bad idea, right?szut (Zone 6 - MA)
8 years agoHi Karin.
I would love more detailed pictures of the inside! Including how you might have done electrical - including any lights! We ordered the Riga V and it is enroute - yay!
How did you dig down the insulation that goes vertical along the inside of the base? Did you put the base in first and then dig down? Or did you install it at the "same" time as the base? We are trying to figure out how to do that.
Also in addition to the vertical insulation I'm thinking of putting 1" T250 insulation horizontally on the outside of the greenhouse by the base so that it goes into the C channel base and then have a bit of sand and pavers on top.... Do you think that would work? (This would raise our frost line which I think they say is 3-4ft and I'm not digging down the vertical insulation THAT deep.)
Also with your site prep - did you have any settling after you leveled the base? We are concerned that since we have to raise a corner to be level with the other corner that the earth could settle (even though we are tamping it down) over a freeze/thaw cycle...
We are possibly going to be putting up our greenhouse this coming Memorial Day weekend if we can finish site prep so I appreciate any help!
Thanks!
karin_mt
Original Author8 years agoHi Szut,
Exciting for the Riga V. Excellent choice! A friend of mine just got that one 2 weeks ago.
DH and I just had a nice discussion to see if we can remember the details of how we did the foundation. Between the two of us, I think we got it.
To address settling, we buried a concrete pier or big block under each corner. I don't know exactly what type of block it was - either a big block, or one of those blocks that's used to support deck footers. But you get the idea.
Then the base frame was set on that and buried partway.
Then I dug in the styrofoam on the inside of the base frame.
Once all of that was in place, we assembled the greenhouse on top of that.
Sure, you could use additional insulation going out horizontally. Seems like it might help. Especially if you don't have snow cover in the winter. Snow helps a lot with keeping the ground from freezing too deeply.
I'll try to get some more pics over the weekend. Good luck with getting things ready!szut (Zone 6 - MA)
8 years agolast modified: 8 years agoKarin - Do you snowblow around the greenhouse all winter or do you let the snow just accumulate? If you do snow-blow how often do you do it? (Or rather how much snow do you let fall before you feel you need to get it off the structure?)
We LOVE the idea of setting blocks to level everything! We think 6 blocks is enough for the Riga V (one in each corner and an extra one on each of the long sides). Do you think so? How many did you use? We also plan to somehow attach the C channel to these blocks as extra anchoring since we sometimes get hurricanes that blow through...
Also is there a "gutter" type thing for the Riga? Or does water just go to the ground around the base of the RIGA and is diverted by the ground material?
How long did it take to put up your greenhouse after you leveled your blocks? What about your friend's Riga V? And how many people for each project?
karin_mt
Original Author8 years agoSnow just slides right off. Sometimes if the snow is wet and cohesive it will stick to the greenhouse up to a thickness of maybe 3 inches or so. But then it slides off. Maybe a handful of times I've reached up with a push broom to pull snow down. But very rarely.
Then I just shovel a path to the front door. I let snow pile up all around the edges of the GH as that is nice insulation.
I don't think you'd need to anchor the foundation to the concrete blocks. The thing is really solid. But it can't hurt. Actually we don't get hurricanes, so maybe you are right. We get storms but no more than 40mph here at the house.
No gutter. The water just goes to the ground and it hasn't been a problem.
We put up ours in one long day with me and DH and then 15 minutes of help from a neighbor right at the very end when a storm was approaching and we really needed to get the last wall on.
We helped a friend build their Riga IV also in one day with 4 people. For the Riga V I'm not sure. Really it's not that much more work. The structure is pretty weak until the last wall goes on, so it's a good idea to get it all the way done once you start. We were super organized, I had watched the video a few times and had the directions written out and the video was queued up on my laptop. DH is very methodical and he's all-business when it comes to stuff like this. So it went well for us. The directions are confusing though, so time spent thinking things through and identifying what they mean in the various steps is helpful. Some of the parts are subtle in which direction they go, notably the main ribs.
I took some photos for you on Monday - I'll add them in the next post.karin_mt
Original Author8 years agoWe put a light right over the front door, connected via extension cord to the electrical outlets at the back of the GH. This is not ideal. I'd rather have an outlet, and a light switch there at the front. I also plug in heat mats and a fan at the front of the GH. Too many extension cords and power strips for my taste.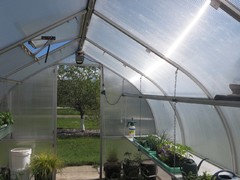 Electrical outlet in the back of the GH. The box is waterproof. Two outlets is definitely not enough!

The water line. This ties into the water inside the basement. In the basement there is a valve to shut the GH water line off and drain it in the winter. That's key!
The valve down low, with the red handle, is for the misting system. It's nice to have that be it's own thing and out of the way of everything else. I attach a mineral filter to the valve, and then it goes into the thin tubing that runs up along the center of the ceiling beam. There are misting nozzles every 3 feet. It's awesome! I just crack that valve barely open and I get an even drizzle that I can leave on all day.
The water and electric are on opposite sides of the back window. Here is a somewhat messy picture of the arrangement. Potting bench on the right, bins of soil on the left. Also some black buckets of water for thermal storage. The small white bucket is to help the cats jump up to the shelves. If they don't have an easy way to get up there they get creative.
Hope that helps!
- Karin
szut (Zone 6 - MA)
8 years agoThank you so very much! This is very helpful.
I see the screws (I think) that you used to attach the electrical and water post to the endwall. What did you use? Did you thread them in as you installed the wall or later?
I'm planning two sets of outlets - one in the back same as you and another in the front by the door.
How high is the GH at the edge of the bottom shelf? I'm debating if I want to consider building it up higher or if it is good enough.
I've been reading some reviews and it says that the windows leak rainwater... Have you had that problem and if so how did you rectify it? (or didn't you?)
Is there a way to have the back shelves not go the full length or do they need to do that for rigidity? I hadn't been planning a potting bench (I usually pot outside on the driveway on a warm day so that my mess just washes away easily) and am now debating it.... But I don't want to lose space on my south side wall (I plan to have the orientation run E-W). Any thoughts/advice?
Any way that you can get a close-up picture of your front door area - including the sides? It helps me to consider what I haven't thought of yet!
I've started watching the videos and taking notes... I think I'll plan to build the two endwalls and lay them on the ground a day prior to putting the rest up! Exciting and nerve-wracking at the same time!
vtgrower
8 years agoJust my two cents regarding snow since I live in Vermont and we get LOTS of snow. I have a Riga V and we do shovel around the sides of the greenhouse because it piles up too high along the walls. When it gets too high then the snow has no place to go when it slides off the top.
szut (Zone 6 - MA)
8 years agoVTGrower - thank you! did you insulate in-ground as you installed your Riga? If so what did you do? Any advice on what you would do different, or things that you did that you think worked out well?
vtgrower
8 years agoWe followed Karin's instructions (with insulation and everything else) and it worked out well but it was VERY challenging for us. We are not at all handy so this was quite an undertaking. We also prepared by reading and re-reading the instructions and watching the video. The advice I would give is to pay very close attention to the nuts and bolts you need to slide into place for shelves, etc. When you forget one of those sometimes it's a real pain to backtrack to the point where you can insert the nut and bolt in the right place. We did it in one day also with just the two of us (and we are still happily married)!!! It was a LONG day. We also received EXCELLENT Customer Service from Riga when we called with questions. The most positive thing I can say is if we could do it ANYONE can do it. Best of luck to you and I know you will love your Riga Greenhouse. This is my first year but it really saved me with starting all of my seeds. For the summer I plan to grow cantaloupe and watermelon since they are difficult crops to grow in our area (at least for me). Good luck!!!
vtgrower
8 years agoWe did. The directions we had indicated the black rubber seal was to be placed in one piece around the 3 sides of the roof window however this made the corners rounded rather than squared so they leaked. Riga Customer Service recommended we cut the corners. We have yet to do this so I don't know if it will work or not.
szut (Zone 6 - MA)
8 years agoThank you VTGrower. I'm just curious - but doesn't the leaking bother you? Do you know yet if it gets drafty in colder weather around this seal? (You mention it is your first year so I don't know when exactly it went up - last fall, or earlier this spring.)
Did you buy any accessories with it such as the exhaust fan or the shelf system? If so how are they working for you?
vtgrower
8 years agoThe leaking is not excessive so it doesn't really bother me but we need to get it fixed because as you said it is definitely drafty in colder weather. It's my first year - we put it up last fall and didn't use it for the winter. All of the accessories came with our Riga V - 2 heaters, exhaust fan, Power Shutter intake vent, thermostat. None of these are installed yet. We are scheduling an electrician to come out in a couple weeks to install a quad outlet for these accessories. I don't plan to use it in the winter since it would be too expensive to heat. I also need to experiment with the shade cloth - it's a necessity but I don't know how to install it. Obviously I have a lot to learn.
karin_mt
Original Author8 years agoHi Szut,
Sorry my participation here is so intermittent! Sounds like you are making great progress and it's nice to have another Riga owner chiming in too.
The shelves are 30" off the floor. You need to install the metal railing that holds the shelves for the full length of the GH. But you do not need to put in the plastic shelf panel in every section. So you could leave a section out. I pop the shelves out in the summer to let tomato plants grow straight up to the ceiling.
A potting bench is really sweet to have. Such as, for planting seedlings in late February... in a t-shirt!
Our windows do not leak. Is that the back window or the roof vents that leak? Our roof vents drip a tiny bit, at the corners, but it's not a big deal at all.
I haven't gotten around to more photos - sorry! I'm traveling for the rest of the week but can try to get more over the weekend.
Good call on pre-assembling stuff. That is a super idea and will make things much faster on the installation day.
Good luck with the continued prep!
- Karin


karin_mtOriginal Author