


Kohler 16hp Command Engine Nagging Won't Start on Simplicity
I picked up a 2002 Simplicity Regent Hydro at a rummage sale that apparently wouldn't start, so I took a gamble on it. It turns over well, but just won't fire. With some starting fluild, I can occasionally get a little backfire puff.
Here is what I have checked on this Kohler 16hp CV16S-4350 Command engine...
- Cleaned Carb
- Carb fuel solenoid is working
- Checked for spark and even put in new spark plug.
- Removed valve cover...appears both exhaust and inlet move freely up and down when I turn crank. They are not adjustable since they are apparently the hydraulic lifters.
- Checked key on crankshaft/stator and looks perfect.
- Checked ignition coil by just increasing the gap a lot on an old spark plug and seeing if it jumps the big gap, and it does. So I am thinking the coil is good.
- I am assuming it is not a fuel problem since I get nothing (no fires) when spraying starting fluid in the spark plug hole.
- I barely measured 30 on a compression test, but I kind of knew that a compression test on these engines is not valuable due to the compression release mechanism.
I am thinking it is a timing issue, but not sure how it could be a timing issue.
-Could it still be ignition coil even though spark is good (bad timing caused by bad coil)?
- Should I buy a piece of equipment to do a leak test, but not sure how to do a leak test since I read a leak test should be done with a warm engine?
- Could it be a head gasket or bad valves? How do I make this determination?
I have researched a lot on the web and just kind of go in circles. I would appreciate any advice on next steps.
Comments (40)

rcbe
10 years agoOne of the things you might chk is for a partially or fully sheared flywheel key. Such will drastically affect engine timing.
This involves carefully removing the flywheel which usually requires an impact wrench and then a torque wrench to get the correct reassy clamp load. If you have same or experience in doing such, fine. If not, post back and one of us will try to assist you in detail.
M/W, get the engine detail from it's ID plate/decal; go to the Kohler engine website. There you can download specific owners/service/parts manuals free for your engine. They will help you greatly thru this entire process.mikulskn
Original Author10 years agoThanks for the info. I did take off the cover, remove the bolt/washer of the flywheel. Then I looked down the keyway, and the key seems nicely fitted. I did not remove the flywheel, just looked down the keyway. Do I need to remove the flywheel to really know if the key is sheared???
Related Professionals
Grand Haven Landscape Architects & Landscape Designers · Zion Landscape Architects & Landscape Designers · Sahuarita Landscape Architects & Landscape Designers · Westwood Landscape Contractors · Allentown Landscape Contractors · Lynwood Landscape Contractors · Mahwah Landscape Contractors · Monterey Landscape Contractors · New Berlin Landscape Contractors · North Haven Landscape Contractors · Overland Park Landscape Contractors · Santa Ana Landscape Contractors · West Haverstraw Landscape Contractors · Dracut Window Contractors · Edwardsville Window Contractorsrcbe
10 years agoGiven what you have described, I would. Perhaps some of the other regulars on this forum can comment..?
mownie
10 years agoI would be highly suspicious of the SAM (Spark Advance Module).
Have seen a few threads on here where the SAM was faulty and messing with an otherwise sound ignition system.
One thing to note is that while the magneto itself is a completely self powered component (no battery power involved), the SAM DOES require battery voltage supplied to it in order for it to function.
You can get the Kohler service manual free from the Kohler website and it gives an outline on testing the SAM.
And yes, Kohler says you need their spark tester (part # KO 1046) to perform the test, along with a multi-meter.
No need to remove the flywheel if you can see that the keyways are aligned exactly.mikulskn
Original Author10 years agoThanks so much for the quick replies!!
I did take off the flywheel and key is perfect...so no more mystery there.
I like the thoughts about the SAM module. I will dig into that on Sunday.
mikulskn
Original Author10 years agoAfter the hint in previous posts about the SAM moudle, I started doing more research about the SAM module. It seems that there is a "DSAI" conversion kit now (due to a history of problems) that replaces the SAM and the ignition coil with a combined SAM/coil that does not require an air gap setting. See links below.
Link to conversion kit instructions:
http://www.mymowerparts.com/pdf/Kohler-Miscellaneous-Manuals-and-Bulletins/26513392317.pdf
Link to kit on ebay which shows the pieces for $88:
1) Has anyone heard of doing such a move on these Kohler engines to fix a no start situation with spark? And would any recommend this as a logical next step?
2) I am still struggling how this all relates to a No-Fire situation when I do see good spark at the plug. I would think the flywheel controls the timing and the SAM just controls the safety stuff. And if I am getting a spark, then the coil and SAM are both good. Or does the SAM control the timing as well? Sorry I am a little unsure about this, but would appreciate if any one could clear up my mind on this.
Thanks so much for any input.
mownie
10 years agoBecause the SAM has the ability to "change the spark TIMING", the spark you are seeing might be occurring at the wrong time.
I will take this opportunity to state again (for those who haven't read it already) that testing for spark OUTSIDE of the combustion chamber is not assurance that a spark also happens INSIDE the combustion chamber.
It is well documented that a spark may show visible on a spare spark plug laid on the engine....................but that same ignition system falls flat on its face when asked to make a spark in the presence of an air/fuel mixture under compression inside the engine.
So, though you see a spark with your testing method, that's no guarantee the spark happens inside the engine, or that the spark is happening at the right time.
But, since it is hard to say anything for sure about the condition of the engine, perhaps you might want to try a cylinder leakage test.
All you really need to do this is an adapter fitting that will thread into the spark plug hole and mate up to a compressed air hose. If you do not have compressed air you can't do this.
You also must understand that the engine crankshaft MUST BE HELD firmly with a socket wrench on the flywheel nut to keep the engine from turning when compressed air is applied to the cylinder.
The engine must be positioned so it is in the beginning of the power stroke (just past top dead center of the compression stroke).
While the engine is held firmly against turning (a trusted helper is welcome here), put air pressure on the adapter fitting that is threaded into the spark plug hole.
The test must be done with the air filter removed, and the oil filler cap, or the valve cover removed as well.
With air pressure applied to the adapter, LISTEN for escaping air pressure.
If you hear air hissing, determine if it is leaking out the muffler (exhaust valve problem), the carburetor (intake valve problem), or if it is leaking out the oil fill tube or valve cover area of the head.
If the air is leaking out the oil fill or the valve cover, it could indicate a problem with a head gasket or a problem with the piston. You would have to remove the head to determine further on that one.This post was edited by mownie on Sat, Jul 27, 13 at 23:09
tomplum
10 years agoEven though Kohler won't publish a spec, 30 is way too low in my opinion. You could look carefully at both valves again and you may note one may not be extending quite as far when closed. get beyond where the ACR will affect it. Worth a look especially if the engine is dirty as debris at the seat or an out of place seat will affect your compression. Maybe even to go further. I don't see enough spec # to know whether or not if your engine has SAM or not. In either case, Mownie is correct that they can throw spark at the improper time. In my experience, it will produce an inconsistant spark.
For future readers , it simply isn't possible to verify a sheared key on a Kohler w/o flywheel removal. They don't use a straight key that is slid in from the top rather a woodruff style key. Even some twins use a key that is partially sheared in appearance- so don't judge from that either w/o researching. fortunately, when then do shear- they usually do a good job of it.User
10 years agoNifty spark plug firing indicator...
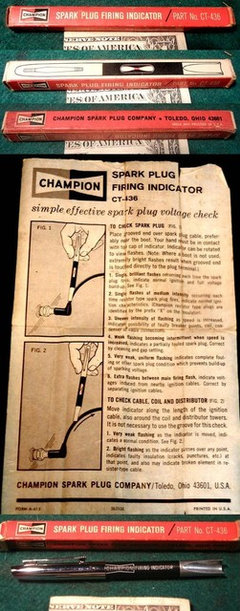
This post was edited by justalurker on Fri, Aug 2, 13 at 11:17
mikulskn
Original Author10 years agoWell I did the leak test with a homemade tester. I had the psi around 30. It seems like a lot of air is coming out of the exhaust. At first I thought maybe I was not on the compression stroke or I was not at top dead center, so I turned the crank another revolution to the same point, and still had significant air coming out of the exhaust. In fact, I can rotate the crank two revolutions and it seems there is air always coming out of the exhaust...obviously pointing to an exhaust valve issue.
- What would be my next steps be to pinpoint the problem?
- Could I have done the leakage test incorrectly?
- Could is still be a push rod / cam problem in the crankcase, or is it most likely a more simpler valve problem?
- I found top dead center just by looking in the spark plug hole. I was surprised how far the magnet was past the ignition coil, like 3/4 inch. Is this typical?Thanks again for any input.
mownie
10 years agoWell, that certainly sheds a different light on the issue.
You CAN"T find top dead center just by LOOKING in the spark plug hole.
There are 2 points in the 4 stroke cycle where the piston will be at TDC.
One is TDC on the COMPRESSION STROKE, the second is at TDC on the EXHAUST STROKE.
To identify which stroke the engine is actually on, you must be able to infer that by knowing the positions of the valves during the respective strokes.
At TDC on the COMPRESSION STROKE, both valves will be seated, which is to say both are CLOSED, and both rocker arms will be completely UP at the valve stems.
At (or near) TDC on the EXHAUST STROKE, the Intake valve will be CLOSED (rocker arm UP at valve) while the Exhaust valve is open (rocker arm DOWN at valve).
Normally, an experienced mechanic might detect the compression stroke by placing a thumb or finger tip over the spark plug hole to feel the compression pressure, but in cases where compression may be compromised, it's best to "read the valves" positions to ID the relevant stroke.Going back to the appearance of the valves and their movements, in addition to "being free", do both appear to be moving the same distance (valve lift).
And do both valves extend equal distances above the cylinder head deck?
Kohler specs for valve lift are given as a MINIMUM REQUIRED LIFT.
Exhaust valve = 8.96mm
Intake valve - 9.14mm
If that exhaust valve is not moving anywhere near that amount of travel, or......if the exhaust valve is not rising as high as the intake valve when the valves are fully closed, you could have a bent exhaust valve face, OR, there may be a problem in the compression release causing the ACR to be holding the exhaust valve open slightly.
Removing the head would confirm whether or not the exhaust valve was bent.This post was edited by mownie on Sun, Jul 28, 13 at 18:25
mikulskn
Original Author10 years agoWell it is a little bit difficult to measure the travel with any good degree of accuracy, but in measuring each one, they both seemed to travel in the 9mm range. But each one had significantly different starting and stopping points from the base of the head. I then removed the rockers and push rods. I did the leak test again, and a lot of air came out the exhaust. And I noticed the exhaust valve does not come out nearly as far as the inlet valve. So it definitely looks like the exhaust valve is not seating.
What is next step....removing the head to see what is happening with the exhaust valve?
tomplum
10 years agoThe head comes off and you will find either something like mashed throttle plate screw lodged in the seat or valve seat that has come out and didn't fully retract in. Happens on these especially w/ dirty cooling systems.
mikulskn
Original Author10 years agoPull the head and the valve seat and valve look all banged up. Also, the top of the piston is a little damaged by hitting the valve, but cylinder wall looks good. Is this ok to run with top of piston surface like shown in one of the pics below.
See picture links below.
I could do a whole new head kit of $200 (kit part number 1275581-S), but now am a little concerned about the piston surface (but maybe that is ok to have that surface damage).
Any suggestions on what someone should do in this situation? Put in the $200 and hope nothing else is wrong? Or just abandon the repair effort at this point?
Links of pictures:
https://docs.google.com/document/d/10fTbhp4wkNUHBvIDirpSIyXB7KlOSMHFWx9psn8sfEY/edit
https://docs.google.com/document/d/16B1Y0Y3imcSq84hX6MyCOpU518Y3nVdl_ESwy9fMcs0/edit
Here is a link that might be useful: Bad Valve
mownie
10 years agoYes, probably be most cost effective to replace that head with new, or good used if you can locate one.
Piston is marked but still usable.
Take careful note of what tomplum says about a cause of valve seat loosening being a dirty or blocked cooling system.
We hear horror stories fairly often where engines have been trashed by mice building nests or making food caches under the concealment of the metal shrouding that comprises the cooling air duct work.
Be sure you strip off the sheet metal and check that there isn't some junk under there that you don't need.tomplum
10 years agoWell, if you wished to try it on the cheap- you could likely reset the seat in the head whilst peening it in place. Most likely the bore that the seat rests in is good enough to accommodate this. In the end the head gasket set and a little valve lapping is all you would be out. I think Mownie has a pic on that if you have questions. A shop would put the new head in most cases.
mownie
10 years agoYou mean of the peening/staking?
Yeah, it would be worth a try if the valve seat bore in the head is not all chewed or marked up.
I would want to pull the valve seat out of the head and inspect the counterbore and also check the seat closely for any cracking.
The seat would need to be driven solidly down into the counterbore before commencing any staking.
Use a 1/8", flat tip pin punch, not a sharp ended punch for the staking.
Alternate stakes at 180 degrees using an even distribution sequence that will be complete when there is a stake mark all the way around with the marks practically touching each other.
And I suggest that you pay attention to the angle of the pin punch where you strike the head. You want to keep the punch tilted at a very slight angle so the metal is displace TOWARD the seat. Strike the punch just hard enough that it leaves only a half circle shaped indentation.
Don't rest the end of the punch right against the edge of the counterbore, let the punch touch the head about 1/16" to 3/32" away from the edge of the counterbore.
After you have made your first 4 stakes, recheck that the valve seat is still completely down square in its bore.
I believe if it was me doing it I would buy a new valve. The old valve may be bent or warped because the piston was striking the valve on one side only, therefore the valve may have bent and the valve seat may even be slightly tilted in the bore.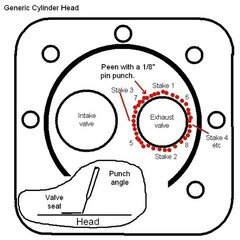
This post was edited by mownie on Mon, Jul 29, 13 at 0:57
mikulskn
Original Author10 years agoI like you nice directions on the peening/staking. But even without taking the valve off, I can see there is a lot of damage around the counter bore (like it got banged a lot by the valve/seat). So I think doing the peening/staking is really not an option (especially for someone like me who has never done it before). I suppose I just need to remove the valve, and I need to look up how to remove the valve since it is really spring loaded a lot. If you have any hints on how to remove the valve, I would appreciate it.
Then I think I just need to decide if I should go ahead and buy a new kit (just need it let it roll around in my head for a couple days while at work).
mownie
10 years agoIf you have not yet gone to the Kohler website and downloaded a free copy of the service manual in PDF, I suggest you do that ASAP.
Page 9.9, Figure 9.28....shows a typical valve spring compressor tool that would be helpful. Usually with very small engines such as this, you can manage pushing the valve spring down by hand and removing the keeper halves with a small magnet screwdriver. You will need to have the actual valve face resting on some solid object on the work bench so the valve remains stationary when you press down on the spring. It is helpful to "break loose" the grip of the keepers to the spring cap and valve stem by placing a socket or other such object that is larger than the diameter of the valve keeper circle in the spring cap and lightly striking that socket with a small hammer, otherwise you may think the spring is not going to depress with finger pressure.
Wear eye protection in case you let a spring slip.
If you undertake this adventure, and find the valve seat counterbore to be badly marked up, or if you can see where the valve seat has raised a "shaving burr" in the bore from being hammered by the piston..............abandon any intent to reuse the head.
If the counterbore is not smooth and unmarked, it is unlikely that the VALVE SEAT will seal against the COUNTERBORE.
The upshot of that is that there will be a leak of combustion between the valve seat and the head which will lead to eventual "fire etching/erosion" of the head.
Though the type of repair we are discussing here is not what a typical pro shop would "automatically" do........it is nonetheless a viable repair, provided the condition of the counterbore and valve seat are good enough to proceed.
This is considered an "advanced level" of skill (or courage) in the DIY realm.mikulskn
Original Author10 years agoI took the valve out, and the valve/seat don't look all that bad. But as you can see in the photo in the link below, the aluminum head really got banged up...seems like no way to do a repair.
Questions about buying a head kit.....I noticed on the existing head I have, there are two bolts (headless bolts) insert into the head for the carb and two bolts inserted into the head for the muffler. Does the new head come with these four bolts already press inserted into the head? Or do I have to somehow remove the old bolts from the existing head and somehow put them into the new head?
Here is a link that might be useful: Picture of valve/seat off
mikulskn
Original Author10 years agoI just ordered the kit and some new studs for the muffler mount. Maybe I will get the parts by the weekend. Thanks for all the advice so far. I will update when I get the parts and start installing.
mownie
10 years agoYeah, I would be real skeered of that head. That darn valve seat must have danced all over the place while it was getting hammered by the piston/valve.
Are you ordering a complete head with the valves assembled into it already? Or is it a "bare head" where you must transfer your valves and springs to it?
If it is a bare head I hope you ordered a new exhaust valve because the valve that did all this damage sure ain't to be trusted, not even as a paper weight.mikulskn
Original Author10 years agoI am ordered the entire cylinder head kit that includes new valves/rockets/pushrods/rockers/gasket/etc. I was thinking if I ordered a just a new head,valve, and gasket, I would be getting up to the price of the whole kit itself. So I just went with the whole kit. It is Kohler part number 12 75 581-S. It came to $178 plus $12 shipping at http://www.smallenginesuppliers.com.
mikulskn
Original Author10 years agoI opened the new kit and everything looks fine, except I noticed something. The old push rods have a hole going thru the length of the rod, presumably to allow some oil flow thru it. But the new ones in the new kit do not have this hole and are just solid. Do I just go with the new ones?
mownie
10 years agoOh geez! That needs to be taken up with Kohler (or whoever you sourced the kit from).
Push rods that feature a hole (on any make of engine) are generally used only with hydraulic lifters, and this engine is supposed to have hydraulic lifters.
In applications with hydraulic lifters with hollow push rods, you will also find a hole in the ball pocket of the rocker arm (where the push rod seats) that allows for oil transported up the push rod to be "thrown" off, and "splash distributed" to oil the other moving parts of the valve train on top of the cylinder head deck.The critical significance of a lack of holes in the replacement push rods is that not only is it possible that the valve parts atop the head may not get adequate (if any) lube oil, the action of the lifters themselves may be affected.
The oil that is transported through the push rods enters the push rods by means of a hole in the push rod socket on the lifter. Oil that makes its way to the push rod has already flowed through the lifter and may essentially be considered as "bleed off" oil. Covering the oil hole in the lifter with a solid push rod might affect how the lifter operates as it can no longer get rid of the "bleed oil".
Different engine lube designs address the oiling needs to the "top end' of the engine in different ways. Some engine designs rely solely on oil transported through the hollow push rods to lube everything topside.
Other engine designs feature solid push rods and a dedicated oil pressure gallery is designed into the engine block and cylinder head (or external oil pressure tubes are fitted) to be distributed to the top end parts.
If this engine in question relies on oil to the top from the hollow push rod configuration, then you can't replace hollow push rods with solid push rods.
If the engine design specified hollow push rods as the top end lube system, the block and head probably do not have a dedicated oil gallery feature to carry oil pressure to the top.
In other words.............STOP RIGHT THERE, until you get some assurance from Kohler that the head kit you purchased is going to work on your engine.
Maybe tomplum can shed some light on this, he gets frequent exposure to Kohlers.tomplum
10 years agoYou should have instructions with the head kit. Google TT-439-a if you didn't. The different rods reflect changes in the lifters they made ~ 5-6 years ago. They should be a go either way. There are no notes that I see saying that you need to replace the lifters tho some techs do- especially if they have issues bleeding -see instructions in the manual. They can be finicky.
mikulskn
Original Author10 years agoThe kit did come with the manual, and like you read, there is no reference to changing the hydraulic lifters to something else in conjunction with the solid push rods.
I have sent a message to kohler via online to ask them. Not sure how long it will take them to respond.
Would it just be ok to use the old push rods, or is that just not a good idea?
And if I use the new solid push rods, how would I know if there is an issue with them?
mikulskn
Original Author10 years agoJust found some more information about the change to the solid push rod. Using link below, see the second page of this Kohler Service Bulletin 264.
Any thoughts?
Here is a link that might be useful: Koher Service Bulletin 264
mownie
10 years agoWell, the implication of it being OK to use the solid rods is explained by Kohler stating that their aim was to cover the bleed hole in the center of the lifter pocket to prevent oil emptying out of the lifter when the engine is not running.
I suppose oil simply traveling to the rocker area by splash and migrating along the push rod gallery is sufficient to lube the valves and such.tomplum
10 years agoTypically Kohler docs are very thorough in a kit like you had gotten. Explain every little thing. I personally install the updated parts in such an install, but I can't think that you would hurt a thing either way. Your bulletin gives you the answer of why the change was made- so why not use the solid rods? The replacement or at least bleeding of the lifters is a good practice when an engine has been left apart.
lt150
10 years agoI have a 15HP Kohler Command on a 2003 JD LT150 that is very noisy when started. After it runs for awhile it quiets down. Kohler came out with solid push rods as a fix for the problem. The Kohler rep said the solid pushrods were install in serial numbers 32200xxxxx and higher. He said they changed the design of the pushrods to eliminate the possibility of air entering the lifters. They came out with a part number for the solid push rods of 12 411 04-S. Like I said I have a 15HP but believe the same would be true for the 16HP. This is information I received back in 2003 but is sounded like it would pertain to your question. Jim
mikulskn
Original Author10 years agoThanks for all the info above confirming it is ok to just use the solid push rods.
But now another question. This evening I put the valves on, and then I was about to put the reed valve/breather and reed valve retainer on. I noticed the hole for the reed valve retaining screw is not threaded. And then I noticed the holes for the bolts that hold the valve cover are not threaded as well. I would think they should be threaded, or are these supposed to be self-threaded when I install the parts for the first time?
mownie
10 years agoLook at the end of the screws that go into the holes.
If there seems to be a slot cut into the threads and/or the bolts are somewhat tapered at the bottom end of threads...........those bolts are intended (by Kohler) to cut their own threads.
But I will say that I am not a big fan of doing things that way.
When I encounter an untapped faster hole, I use the appropriate tap and cut the threads first.
If you MUST use the bolts to cut threads, be sure you use a socket/ratchet and apply plenty of pressure (hand pressure) straight in on the bolt while you trying to get it started.
If you are timid about applying pressure (as if you wanted to push a golf tee into a hard surface) you may end up with a false beginning and a crooked hole.This post was edited by mownie on Sun, Aug 4, 13 at 19:47
mikulskn
Original Author10 years agoUpdate....the engine is running!!!
My son and I had faced a setback earlier in the week when one of the head bolts sheared after the second round of torquing to 36 ft-lbs. That was a bummer, but a couple days later we got the bolt out with an easyout.
We put all the parts of the rider back together (with a new needle/beam torque wrench) and fired it up with some carb cleaner, and it started up fairly quickly!!! As expected, we did have the smoking of burning off of oil, but after 20 minutes or so, that seem to diminish to nothing. Seem to have a little bit of burning oil smell still, but I am hoping that is just some residual oil burning off the frame or muffler shields - those parts around the muffler seem to get very hot.
Only remaining issue was a backfire after turning it off. It happened half the time after shutting it down, even when I would let it idle for 15 seconds before turning it off. But I can probably live with the backfiring. I would welcome any input on this problem, but I can do some research on the internet about this seemingly separate issue.
Thanks so much for walking my son and I through our first fix of this magnitude....usually we only fix fuel problems. It was a really satisfying experience, and I am really grateful for your advice along the way....I was truly amazed.
Again, thanks so much.
rcbe
10 years agomikulskn - you might try shutting down from around 1/2 throttle after letting the engine cool down at full idle for a minute or so. Other Command owners have had some success doing this to avoid the danged backfiring...
bill_kapaun
10 years agoYou want to have the engine at higher speed so all the gasoline vapors are purged from the intake system.
mihi
10 years agoWhen my Kohler Command engine wouldn't start, and it slowly got this way over the period of a year or so, it was because of the pushrods. Apparently the pushrods from the factory were defective, the new pushrod kit the dealer installed corrected this. It costs me $800 as the Kohler had just gone out of warranty by a month or two. My Kubota runs fine now but I wish I could be convinced the new pushrods (which had a different P/N) were going to last a good long while. I mow about 110 to 120 hours a year with my mower, it is now in its 5th season.


mikulsknOriginal Author