


Snapper mower sagging
ken3983
10 years ago
Related Stories

GREAT HOME PROJECTSHow to Make Your Garage a Storage Powerhouse
New project for a new year: Add shelving and containers to get your stuff off the garage floor — and still have room for the car
Full Story
BUDGET DECORATINGPop Culture Watch: Get a Good Rap With Thrift Store Scores
Eight rooms that rock secondhand finds, in an ideabook inspired by rappers taking YouTube by storm
Full Story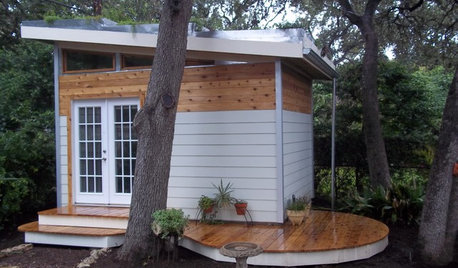
MOST POPULARHow to Add a Backyard Shed for Storage or Living
Need a home office, a playspace or extra room for your stuff? Learn about off-the-shelf, prefab and custom sheds
Full Story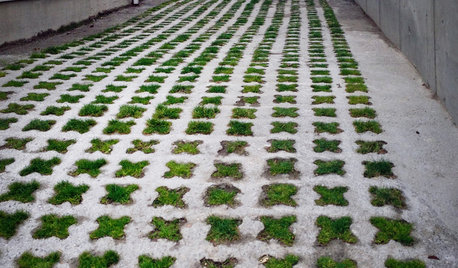
EARTH DAYHow to Build a Greener Driveway
Install a permeable driveway to keep pollutants out of water sources and groundwater levels balanced
Full Story
GARDENING AND LANDSCAPINGBocce, Anyone? Toss Some Popular Games Into Your Yard Plans
Score points for entertaining with a yard set up for lawn bowling, croquet, chess and more
Full Story
walt2002
ken3983Original Author
Related Professionals
Middle Island Landscape Architects & Landscape Designers · Tomball Landscape Architects & Landscape Designers · McKinney Landscape Contractors · Bellefontaine Neighbors Landscape Contractors · Ellicott City Landscape Contractors · Plainview Landscape Contractors · Roseville Landscape Contractors · Shirley Landscape Contractors · Soddy Daisy Landscape Contractors · Wethersfield Landscape Contractors · Town 'n' Country Window Contractors · Bay Point Window Contractors · Greenburgh Window Contractors · Oviedo Window Contractors · Pike Creek Valley Gardeners & Lawn Carewalt2002
ken3983Original Author
mownie
ken3983Original Author
rcbe
andyma_gw
wheely_boy
ken3983Original Author
mownie
ken3983Original Author