


Newbie Advice
token28001
14 years ago
Related Stories
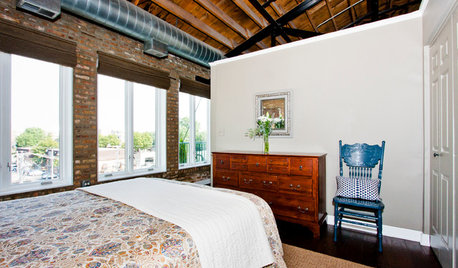
SMALL HOMESHouzz Tour: An Illinois Loft Sparks Renovation Fever
Home improvement newbies (and newlyweds) find joy and a new income source while redoing their space themselves
Full Story
DECORATING GUIDESThe Hottest Houzz Discussion Topics of 2012
Discussions rocked and rolled this year with advice, support, budding friendships — and oh, yes, a political opinion or two
Full Story
FURNITURESmart Shopper: How to Judge Antique Furniture Quality
Pick the treasures from the trash without expert experience by learning how to evaluate antiques and what questions to ask
Full Story
SHOP HOUZZShop Houzz: Style Flowers Like a Pro
The right tools, creative vessels and tips make arranging flowers easy
Full Story
GARDENING GUIDESGarden Myths to Debunk as You Dig This Fall and Rest Over Winter
Termites hate wood mulch, don’t amend soil for trees, avoid gravel in planters — and more nuggets of garden wisdom
Full Story
GARDENING GUIDES10 Tips for Beginning Gardeners
With a simple sketch, basic tools and the right plants, you’ll be on your way to growing your first flowers or edibles
Full Story
FURNITUREDecorating 101: How to Shop for Furniture
Learn what furniture to get rid of, what to look for when buying, and how to avoid mistakes
Full Story
HOUSEPLANTS8 Essentials for Healthy Indoor Plants
Houseplants add so much to our homes — and can thrive when grown in the right conditions. Keep these tips in mind
Full Story
ARCHITECTUREDesign Practice: How to Get Hired
Pro to pro: Strategies for winning a client’s trust and getting work that supports your brand
Full Story
dawiff
northerner_on
Related Professionals
Garden City Landscape Architects & Landscape Designers · Harrison Landscape Architects & Landscape Designers · Norton Shores Landscape Architects & Landscape Designers · Norwood Landscape Contractors · Pelham Landscape Contractors · Waterbury Landscape Contractors · Anderson Landscape Contractors · Boca Raton Landscape Contractors · Costa Mesa Landscape Contractors · Dallas Landscape Contractors · Gallatin Landscape Contractors · Huntley Landscape Contractors · Saint Paul Landscape Contractors · Waipahu Landscape Contractors · West Haverstraw Landscape Contractorsgardencrazy
dorisl
auntyara
northforker
MissMyGardens
paulan70
just1morehosta
token28001Original Author
lgslgs
molanic
Mary Leek
molanic
stage_rat
stlgirl
ivyp
conniesc
karendee
ellenr22 - NJ - Zone 6b/7a
mmqchdygg
bashful_gardener
carrie630